Whispering Pines Forest Floor Throw Free Pattern – A Knitted Textured Woodland Blanket
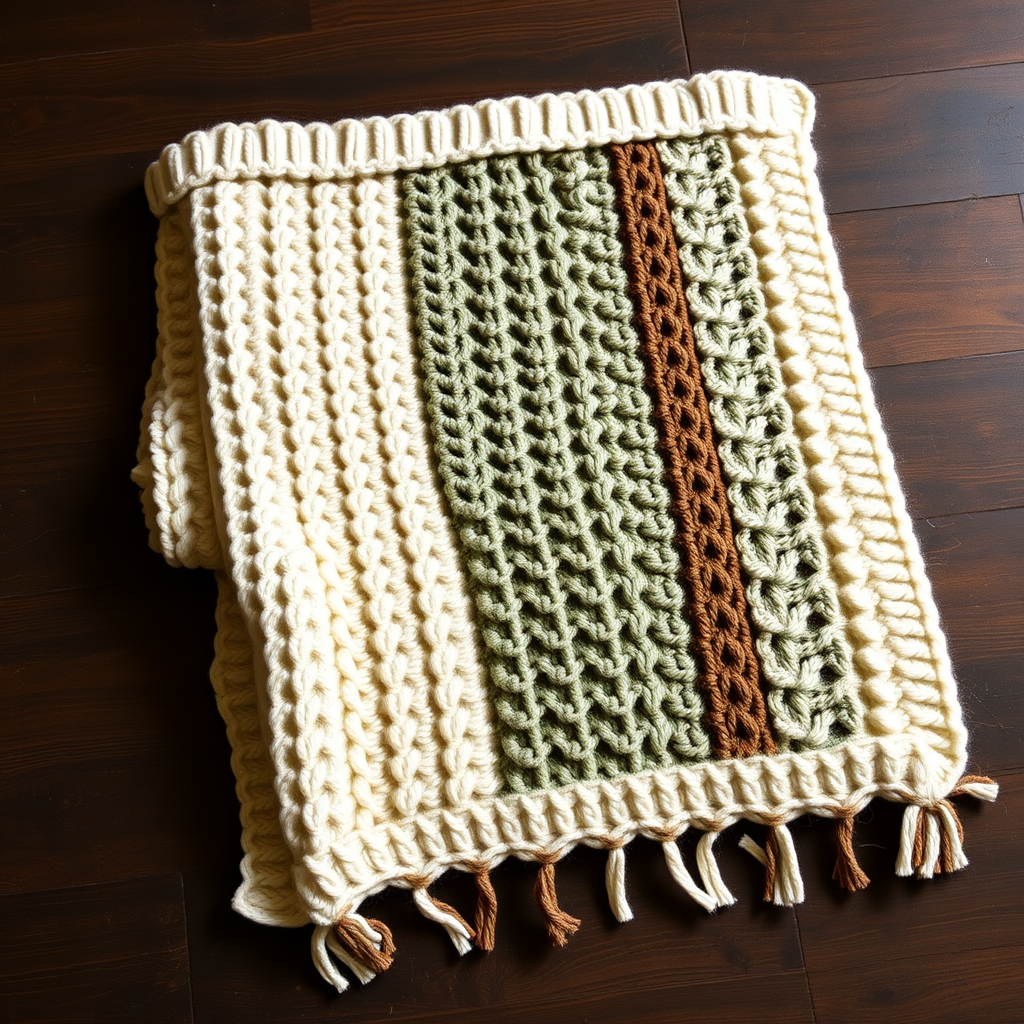
Whispering Pines Forest Floor Throw: A Beginner-Friendly Knitted Woodland Blanket
Imagine wrapping yourself in the quiet serenity of a mossy forest floor, where layers of leaves and twigs create a rich, tactile tapestry beneath your feet. The Whispering Pines Forest Floor Throw captures that exact feeling in a deeply textured knitted blanket. This pattern combines the dense, bumpy charm of seed stitch with delicate lace panels that evoke scattered leaves and woodland paths, all framed by a smooth, creamy garter stitch border. It's a cozy, nature-inspired project that will become a cherished heirloom in your home.
This pattern is thoughtfully designed for knitters of all levels. While it looks intricate, the construction is straightforward: you'll work in one piece from the bottom up, alternating between simple knit and purl stitches and a repeating lace motif. The result is a stunning 48" x 60" throw that's perfect for draping over a couch, curling up with on a chilly evening, or giving as a heartfelt handmade gift. Let's dive into this rewarding project and bring the peaceful beauty of the forest into your living space.
Materials Needed
Before you begin, gather the following supplies. Having everything ready will make your knitting experience smooth and enjoyable.
Yarn
Red Heart Super Saver (worsted weight, 100% acrylic, 364 yds/7 oz per skein) in four beautiful, nature-inspired colors:
- Color A (Aran): 2 skeins – for the border and center seed stitch panel (soft cream)
- Color B (Sage): 2 skeins – for the lace panels (muted green)
- Color C (Coffee): 1 skein – for the fringe (warm brown)
- Color D (Soft White): 1 skein – for the fringe (cream)
Needles & Notions
- US Size 8 (5.0 mm) knitting needles – or size needed to obtain gauge
- Tapestry needle – for weaving in ends and finishing
- Stitch markers – to separate the different pattern sections
- Crochet hook – for adding the fringe (optional but recommended)
Gauge
18 stitches and 24 rows = 4 inches in stockinette stitch (blocked). Always knit a gauge swatch to ensure your finished throw matches the intended measurements. If your gauge is off, adjust your needle size accordingly.
Finished Size: Approximately 48 inches wide x 60 inches long (after blocking).
Step-by-Step Instructions
This throw is worked in one piece from the bottom edge upward. It consists of a central panel of seed stitch flanked by two panels of a lace-and-ridge pattern, all framed by a garter stitch border. Follow these detailed instructions carefully, and you'll be amazed at what you create.
Pattern Stitches
Before you start, familiarize yourself with these two stitch patterns. They are the building blocks of your throw.
Seed Stitch (over an even number of stitches)
- Row 1: *K1, P1; repeat from * to end.
- Row 2: *P1, K1; repeat from * to end.
- Repeat Rows 1 and 2 for pattern.
Lace Ridge Panel (over 14 stitches)
This is a 40-row repeat that creates the beautiful leaf-like openwork. Work all wrong-side rows as purl unless otherwise noted.
- Row 1 (RS): K2, yo, k2tog, k6, ssk, yo, k2.
- Row 2 and all WS rows: Purl all stitches.
- Row 3: K3, yo, k2tog, k4, ssk, yo, k3.
- Row 5: K4, yo, k2tog, k2, ssk, yo, k4.
- Row 7: K5, yo, k2tog, ssk, yo, k5.
- Row 9: K6, yo, k2tog, yo, ssk, k6.
- Row 11: K5, ssk, yo, k2tog, yo, k5.
- Row 13: K4, ssk, yo, k2tog, yo, k4.
- Row 15: K3, ssk, yo, k2tog, yo, k3.
- Row 17: K2, ssk, yo, k2tog, yo, k2.
- Row 19: K1, ssk, yo, k2tog, yo, k1.
- Row 21: K2, yo, ssk, k2tog, yo, k2.
- Row 23: K3, yo, ssk, k2tog, yo, k3.
- Row 25: K4, yo, ssk, k2tog, yo, k4.
- Row 27: K5, yo, ssk, k2tog, yo, k5.
- Row 29: K6, yo, ssk, k2tog, yo, k6.
- Row 31: K5, k2tog, yo, ssk, yo, k5.
- Row 33: K4, k2tog, yo, ssk, yo, k4.
- Row 35: K3, k2tog, yo, ssk, yo, k3.
- Row 37: K2, k2tog, yo, ssk, yo, k2.
- Row 39: K1, k2tog, yo, ssk, yo, k1.
- Row 40: Purl.
- Repeat Rows 1-40 for pattern.
Getting Started: Cast On & Bottom Border
Step 1: With Color A (Aran), cast on 162 stitches using your preferred method (long-tail cast on works well).
Step 2: Work the bottom border in garter stitch (knit every row) for 8 rows. This creates a solid, sturdy foundation for your throw.
Main Body: Setting Up the Pattern
Step 3: Now you'll establish the main pattern. On the next row (Right Side), follow this layout carefully:
- With Color A, knit 8 stitches (this is your side border). Place a stitch marker.
- Switch to Color B (Sage) and work the Lace Ridge Panel over the next 14 stitches (Row 1 of the lace pattern). Place a stitch marker.
- Switch back to Color A and work Seed Stitch over the next 118 stitches. Place a stitch marker.
- Switch to Color B and work the Lace Ridge Panel over the next 14 stitches. Place a stitch marker.
- With Color A, knit the last 8 stitches (this is your other side border).
Step 4: Continue in this established pattern. Remember these key points:
- The 8 border stitches on each side are always worked in garter stitch (knit every row) with Color A.
- The two 14-stitch lace panels are always worked with Color B, following the 40-row Lace Ridge Panel pattern.
- The center 118 stitches are always worked in Seed Stitch with Color A.
Step 5: Repeat the 40-row lace pattern until the piece measures approximately 56 inches from the cast-on edge. Be sure to end with a Row 40 of the lace pattern (a purl row) to keep the pattern aligned for the top border.
Top Border & Bind Off
Step 6: With Color A, work 8 rows of garter stitch across all stitches. As you work these rows, simply knit every stitch, including the lace and seed stitch panels—this will create a clean, uniform top border.
Step 7: Bind off loosely in knit. To ensure a stretchy edge that won't pucker, use a larger needle for binding off or bind off in pattern (knit stitches).
Finishing Touches
Step 8: Weave in all loose ends with your tapestry needle. Take your time here—neat ends make a professional-looking finished piece.
Step 9: Block the throw to the finished measurements (48" x 60"). This is a crucial step! Pin the throw out to size on a blocking mat or towel, paying special attention to the lace panels. Gently stretch and pin the lace sections to open up the eyelet holes and define the leaf patterns. Allow it to dry completely.
Adding the Fringe (Optional but Recommended)
The fringe adds a beautiful, finished look and echoes the earthy tones of the forest floor. Here's how to add it:
Step 10: Cut strands of Color C (Coffee) and Color D (Soft White), each 12 inches long.
Step 11: For each fringe cluster, hold 3 strands together. Mix the colors as you like—for example, 2 Coffee + 1 Soft White, or 1 Coffee + 2 Soft White for variety.
Step 12: Fold the bundle of 3 strands in half to create a loop.
Step 13: Insert a crochet hook from the wrong side to the right side at the edge of the throw (along the cast-on and bind-off edges, and optionally along the side borders).
Step 14: Pull the folded loop of yarn through the edge of the throw.
Step 15: Pull the loose ends of the yarn through the loop and tighten gently to secure the fringe.
Step 16: Space the fringe clusters about 1 inch apart along the bottom and top edges. You can also add fringe to the side borders if you prefer a more finished look on all sides.
Step 17: Once all fringe is attached, trim the ends evenly to about 5 inches for a neat, uniform appearance.
Tips for Success
- Use stitch markers—they're essential for keeping track of the different sections, especially when you're working the lace pattern.
- Count your stitches in the lace panels periodically to catch any mistakes early. Each row of the lace pattern should always have 14 stitches.
- Don't rush the blocking process. This is what transforms your knitting into a professional-looking throw. The lace panels will truly shine after being pinned out.
- Keep a row counter for the 40-row lace pattern. It's easy to lose your place, and this will save you from having to count rows repeatedly.
As you knit the Whispering Pines Forest Floor Throw, you'll find a rhythm in the repetition of stitches—a meditative quality that mirrors the calm of a quiet woodland walk. The combination of textures—the smooth garter border, the bumpy seed stitch, and the delicate lace—creates a sensory experience that's both grounding and uplifting. Whether you're a seasoned knitter or a beginner looking for a rewarding challenge, this pattern will guide you to create a beautiful piece that brings the peace of the forest into your home.
Happy knitting, and may your needles whisper through the pines!


