Whimsical Woodland Gnome Home Free Pattern – A Knitted Cozy Cottage
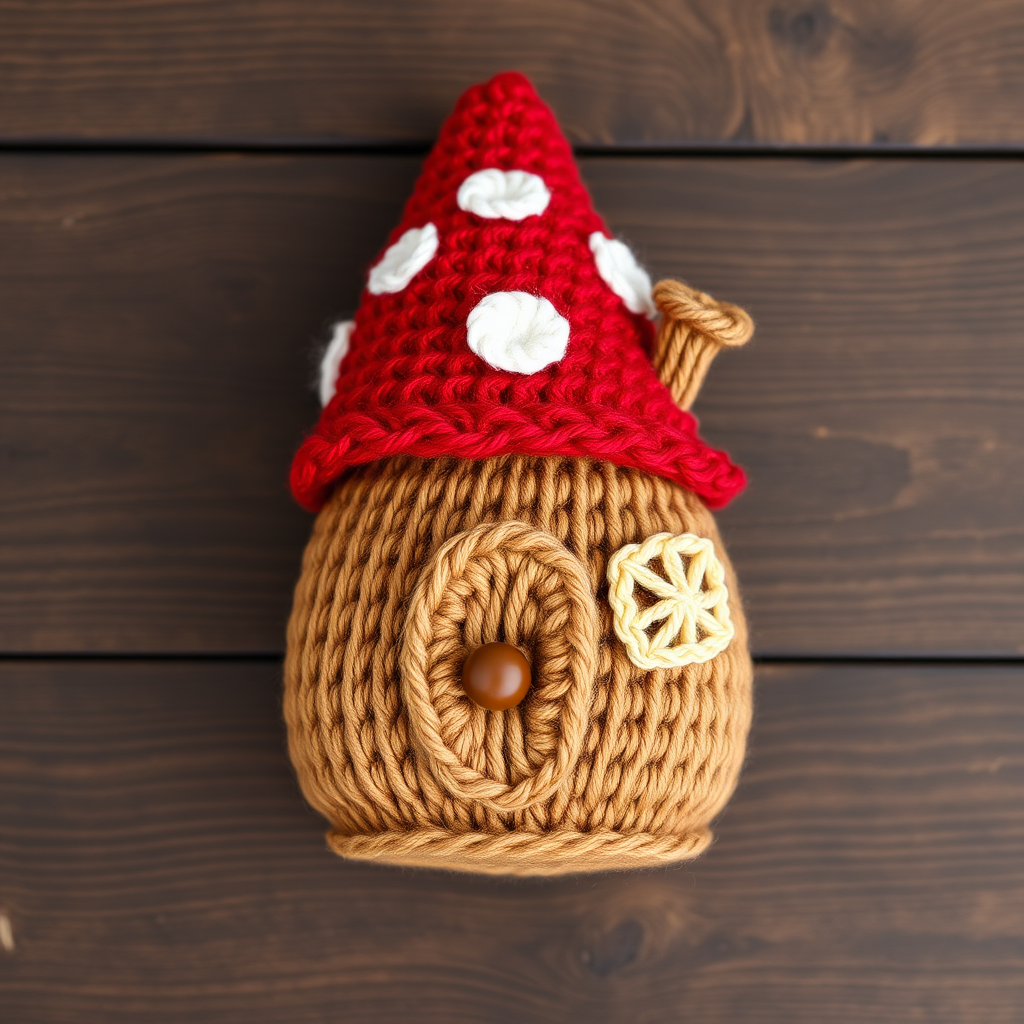
Whimsical Woodland Gnome Home Free Pattern – A Knitted Cozy Cottage
Bring a touch of enchanted forest charm to your shelf with this whimsical knitted gnome home, complete with a mushroom roof and tiny door. This cozy cottage pattern is perfect for adding a handcrafted, storybook feel to any room. Whether you're an experienced knitter or a brave beginner looking for a fun weekend project, this adorable amigurumi-style cottage will become a treasured piece of your handmade decor. The plump, textured body and vibrant mushroom cap roof create a delightful centerpiece that sparks joy and imagination.
This free pattern is designed to be approachable, using simple stockinette stitch and basic shaping techniques. The entire project is worked in pieces and seamed together, making it easy to manage and perfect for using up scrap yarn from your stash. Let's dive into creating your very own magical gnome dwelling!
Materials Needed
Before you begin, gather the following supplies to ensure a smooth and enjoyable knitting experience:
- Yarn: Worsted weight yarn in earthy tones:
- Brown (for the body, door, and chimney) – approximately 100 yards
- Cream (for the windows and doorknob embroidery) – approximately 20 yards
- Moss green (optional, for added embellishments like a small wreath or base) – a few yards
- Red (for the mushroom roof) – approximately 50 yards
- White (for the mushroom spots) – a few yards for embroidery
- Knitting Needles: US 5 (3.75 mm) knitting needles
- Tapestry Needle: For seaming pieces and weaving in ends
- Fiberfill: Polyester stuffing for a plump, soft body
- Scissors: For cutting yarn
- Stitch Markers (optional): To help track your rows and decreases
Gauge: 20 stitches and 28 rows = 4 inches in stockinette stitch. While gauge is not critical for this project, matching it will ensure your gnome home stands about 6 inches tall as described.
Step-by-Step Instructions
This knitted gnome home is worked in pieces and seamed together. The main body is a simple tube, the roof is a cone, and the door and windows are added as embellishments. Follow each section carefully, and you'll have a charming cottage in no time.
Body (Make 1)
- Cast On: With brown yarn, cast on 40 stitches.
- Work Stockinette Stitch: Knit one row, purl one row (stockinette stitch) for 30 rows total. This will create the main cylindrical body of the cottage. Your piece should measure approximately 4 inches in length.
- Shape the Top (Row 31): Knit 2 stitches together (K2tog) across the entire row. You will now have 20 stitches on your needle.
- Row 32: Purl across all 20 stitches.
- Row 33: K2tog across the row again. You will now have 10 stitches remaining.
- Row 34: Purl across all 10 stitches.
- Finish the Top: Cut the yarn, leaving a long tail (about 12 inches). Thread the tail through a tapestry needle, then slide the needle through all 10 remaining stitches on your knitting needle. Carefully slip the stitches off the needle and pull the yarn tight to gather the top of the body into a closed circle. Secure with a knot.
- Seam the Body: With the right side facing out, use the mattress stitch or whip stitch to seam the side edges of the tube together. This will form the cylindrical wall of your gnome home. Leave the bottom open for now.
Roof (Make 1)
- Cast On: With red yarn, cast on 30 stitches.
- Work Stockinette Stitch with Decreases: Begin in stockinette stitch (knit one row, purl one row). On every 4th row, decrease 2 stitches evenly across the row. To do this, you can knit 2 together (K2tog) at the beginning and end of the row, or use a more even distribution (e.g., K2tog, knit 13, K2tog, knit 13). Continue this pattern until you have 10 stitches remaining on your needle. This will create a cone shape.
- Finish the Roof: Cut the yarn, leaving a long tail. Thread it through a tapestry needle, slide it through the remaining 10 stitches, and pull tight to close the point of the cone. Secure with a knot.
- Seam the Roof: With the right side facing out, seam the straight edge of the cone closed using the mattress stitch or whip stitch. This creates the cone-shaped mushroom cap roof.
Door (Make 1)
- Cast On: With brown yarn, cast on 8 stitches.
- Work Stockinette Stitch: Knit one row, purl one row for 10 rows total.
- Bind Off: Bind off all stitches loosely. Weave in the ends or leave tails for sewing.
- Add Doorknob: Using cream yarn and a tapestry needle, embroider a small French knot or a simple cross-stitch in the center of the door to create a doorknob. Position it about halfway down the door, slightly to one side.
Windows (Make 2)
- Cast On: With cream yarn, cast on 6 stitches.
- Work Stockinette Stitch: Knit one row, purl one row for 6 rows total.
- Bind Off: Bind off all stitches loosely. Weave in the ends or leave tails for sewing.
- Add Window Panes: Using brown yarn and a tapestry needle, embroider a cross (one vertical line and one horizontal line) in the center of each window to create the classic pane look. Make sure the cross is centered and straight.
Mushroom Spots (Make 5)
- Embroider Spots: Using white yarn and a tapestry needle, embroider small oval spots randomly across the red roof. To make an oval spot, use a satin stitch: bring the needle up through the fabric, then make small, parallel stitches close together to fill in the oval shape. Vary the sizes and angles for a natural, whimsical look. Space them out evenly across the roof surface.
Assembly
- Stuff the Body: Turn the body tube right side out (if not already). Firmly stuff the body with fiberfill through the open bottom. Do not overstuff, as you want the cottage to be plump but still soft and squeezable. Ensure the stuffing reaches all the way to the gathered top.
- Attach the Roof: Position the roof cone on top of the stuffed body. The gathered point of the cone should be at the top, and the open edge should sit over the gathered top of the body. Angle it slightly to one side for a whimsical, storybook look. Using a tapestry needle and red yarn, sew the roof securely to the body with a whip stitch, going through both layers of fabric. Make sure it's firmly attached.
- Sew the Door: Position the door at the center front of the body, about 1 inch up from the bottom edge. Using a tapestry needle and brown yarn, sew the door onto the body with small, neat whip stitches along its edges. Ensure it lies flat.
- Sew the Windows: Position the two cream windows on either side of the door, about 1.5 inches up from the bottom and 0.5 inches away from the door. Using cream yarn, sew each window onto the body with small whip stitches along its edges. Make sure they are level with each other.
- Create the Chimney: Cast on 6 stitches with brown yarn. Work in stockinette stitch for 8 rows. Bind off. Fold the small rectangle in half lengthwise and seam the side edge to form a small tube. Sew the chimney to the side of the roof, angling it slightly upward. Use brown yarn and a whip stitch to secure it firmly.
- Weave in All Ends: Using a tapestry needle, carefully weave in any remaining yarn tails on the inside of the cottage to keep the exterior clean and polished.
Your whimsical woodland gnome home is now complete! Place it on a shelf, mantel, or windowsill to add a touch of storybook magic to your space. This pattern is also a wonderful gift for friends and family who love handmade decor. Enjoy your cozy creation!


