The Moonlit Meadow Bunny Pillow Free Pattern – A Crocheted Ode to Twilight Serenity
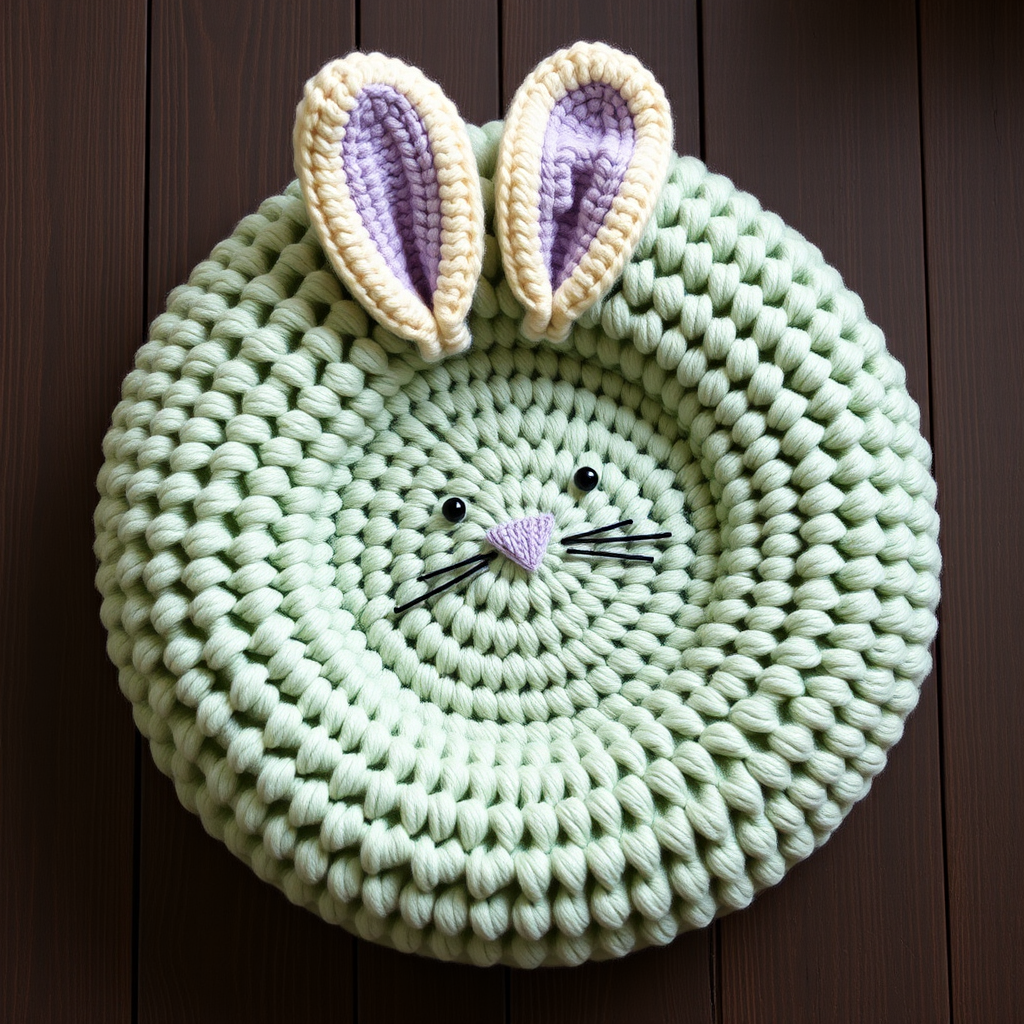
The Moonlit Meadow Bunny Pillow Free Pattern – A Crocheted Ode to Twilight Serenity
Imagine sinking into a cloud-soft cushion that captures the tranquil magic of a moonlit meadow. This oversized, textured bunny pillow is more than just home decor—it's a handmade hug that brings cozy serenity to any room. Whether you're curling up with a book, seeking a heartfelt gift for a loved one, or simply wanting to add a touch of whimsical charm to your living space, this amigurumi-style pillow delivers. With its plush chenille yarn, minimalist sweet face, and gently curved two-tone ears, this pattern is designed to be both achievable for beginners and deeply satisfying for experienced crocheters. Let's embark on this twilight crafting journey together.
Materials Needed
Before we begin, gather these supplies to ensure a smooth, enjoyable crochet session:
- Yarn: Bulky weight (size 5) chenille yarn in three colors:
- Soft sage green (for the pillow body) – approximately 400-500 yards
- Cream (for ear fronts and body) – approximately 100 yards
- Dusty lavender (for ear backs and nose) – approximately 100 yards
- Small amount of black worsted weight yarn (for embroidered eyes)
- Hook: 6.0 mm crochet hook (or size needed to achieve gauge)
- Notions: Stitch markers, tapestry needle, scissors, polyester fiberfill (approximately 1.5 lbs for a firm, plush pillow)
- Optional: Low-heat iron and cloth for steam blocking
Gauge: 12 sc x 13 rows = 4 inches (10 cm) in single crochet with bulky yarn. Always check your gauge to ensure the correct pillow size.
Step-by-Step Instructions
Important Note: This pillow is worked in continuous spiral rounds unless otherwise noted. Use a stitch marker to track the beginning of each round—this is crucial for maintaining the circular shape.
BUNNY BODY (Make 2 Identical Pieces, Then Join)
Each body piece forms a flat, circular face of the pillow. You'll make two and join them together to create the plush cushion.
Round 1: With sage green yarn, make a magic ring, work 6 sc into ring. (6 stitches)
Round 2: 2 sc in each st around. (12 stitches)
Round 3: (Sc in next st, 2 sc in next st) around. (18 stitches)
Round 4: (Sc in next 2 sts, 2 sc in next st) around. (24 stitches)
Round 5: (Sc in next 3 sts, 2 sc in next st) around. (30 stitches)
Round 6: (Sc in next 4 sts, 2 sc in next st) around. (36 stitches)
Round 7: (Sc in next 5 sts, 2 sc in next st) around. (42 stitches)
Round 8: (Sc in next 6 sts, 2 sc in next st) around. (48 stitches)
Rounds 9-18: Sc in each st around. (48 stitches) – This creates the flat circular face of the pillow. Maintain even tension for a smooth, uniform surface.
Round 19: (Sc in next 6 sts, sc2tog) around. (42 stitches) – Begin decreasing to shape the back curve.
Round 20: (Sc in next 5 sts, sc2tog) around. (36 stitches)
Round 21: (Sc in next 4 sts, sc2tog) around. (30 stitches)
Round 22: (Sc in next 3 sts, sc2tog) around. (24 stitches)
Round 23: (Sc in next 2 sts, sc2tog) around. (18 stitches)
Fasten off, leaving a long tail (at least 18 inches) for sewing. Stuff firmly with polyester fiberfill before closing the final hole, OR leave open if you prefer a flatter pillow—see assembly notes below.
BUNNY EARS (Make 4 Pieces – 2 for Front, 2 for Back of Each Ear)
Each ear is made from two pieces (one cream, one dusty lavender) that are joined together. You'll make two complete ears.
With cream yarn (make 2):
Round 1: Magic ring, 6 sc. (6 stitches)
Round 2: 2 sc in each st. (12 stitches)
Round 3: (Sc in next 3 sts, 2 sc in next st) around. (15 stitches)
Rounds 4-8: Sc in each st. (15 stitches) – Work 5 rounds straight for ear length.
Round 9: (Sc in next 3 sts, sc2tog) around. (12 stitches)
Rounds 10-12: Sc in each st. (12 stitches) – Work 3 rounds straight to taper the ear tip.
Fasten off, leaving a long tail (at least 12 inches).
With dusty lavender yarn (make 2): Repeat the exact same instructions as the cream ear pieces.
Joining the Ear Pieces: Place one cream and one lavender piece together with wrong sides facing. Using cream yarn, sc around the entire edge to join them, stuffing lightly as you go. Tip: Insert small amounts of fiberfill as you crochet around to create a soft, dimensional ear. Repeat for the second ear. Fasten off and weave in ends.
BUNNY FACE DETAILS
Now it's time to bring your bunny to life with a sweet, minimalist face.
- Eyes: Using black worsted weight yarn and a tapestry needle, embroider two small French knots or satin stitches for eyes on the front body piece. Position them about 8 rounds from the center of the circle and 4 rounds apart horizontally. For a gentle, sleepy look, place them slightly lower and wider apart.
- Nose: Using dusty lavender yarn, embroider a small triangle centered between the eyes. Make it 3 stitches wide and 2 stitches tall. This creates a cute, button-like nose.
- Mouth: Add a small vertical line downward from the bottom point of the nose, about 1-2 stitches long. This gives the classic bunny mouth shape.
ASSEMBLY
This is where your pillow comes together!
- Position the pieces: Place the two body pieces with wrong sides together. The piece with the embroidered face should be facing you (this is the front).
- Start sewing: Using the long tail from the back piece, whip stitch around the edge. Insert your needle through both layers, keeping your stitches even and close together for a secure seam.
- Leave an opening: Stop sewing when you have about a 4-inch opening left.
- Stuff the pillow: Stuff the pillow firmly with fiberfill through the opening. Be generous—this is what gives the pillow its plush, cloud-like shape. Use your fingers or a blunt tool to push the stuffing into the edges.
- Close the opening: Continue whip stitching to close the remaining gap. Weave in the end securely.
- Attach the ears: Sew the ears onto the top of the pillow, on the seam line, about 2 inches apart. Angle them slightly outward for a natural, relaxed look. Use the long tails from the ears and secure them with several firm stitches, then weave in the ends.
FINISHING
Your Moonlit Meadow Bunny Pillow is almost complete!
- Weave in all ends: Use your tapestry needle to hide any remaining yarn tails inside the pillow.
- Optional steam blocking: If desired, gently steam block the pillow using a low-heat iron with a cloth between the iron and the yarn. This smooths the stitches and enhances the texture, giving it a professional finish. Be careful not to flatten the chenille too much.
- Fluff and admire: Give your pillow a gentle fluff and place it in your favorite cozy spot. Enjoy the twilight serenity it brings!
Congratulations! You've created a stunning, handmade Moonlit Meadow Bunny Pillow that's sure to be cherished for years to come. Whether it graces your sofa, bed, or a reading nook, this plush companion is a testament to your creativity and skill. Happy crocheting, and may your evenings be filled with soft, moonlit calm.


