The Harvest Hearth Scrap Dishtowel Set Free Pattern – A Knitted Trio of Textured Towels with Woodland Button Tabs
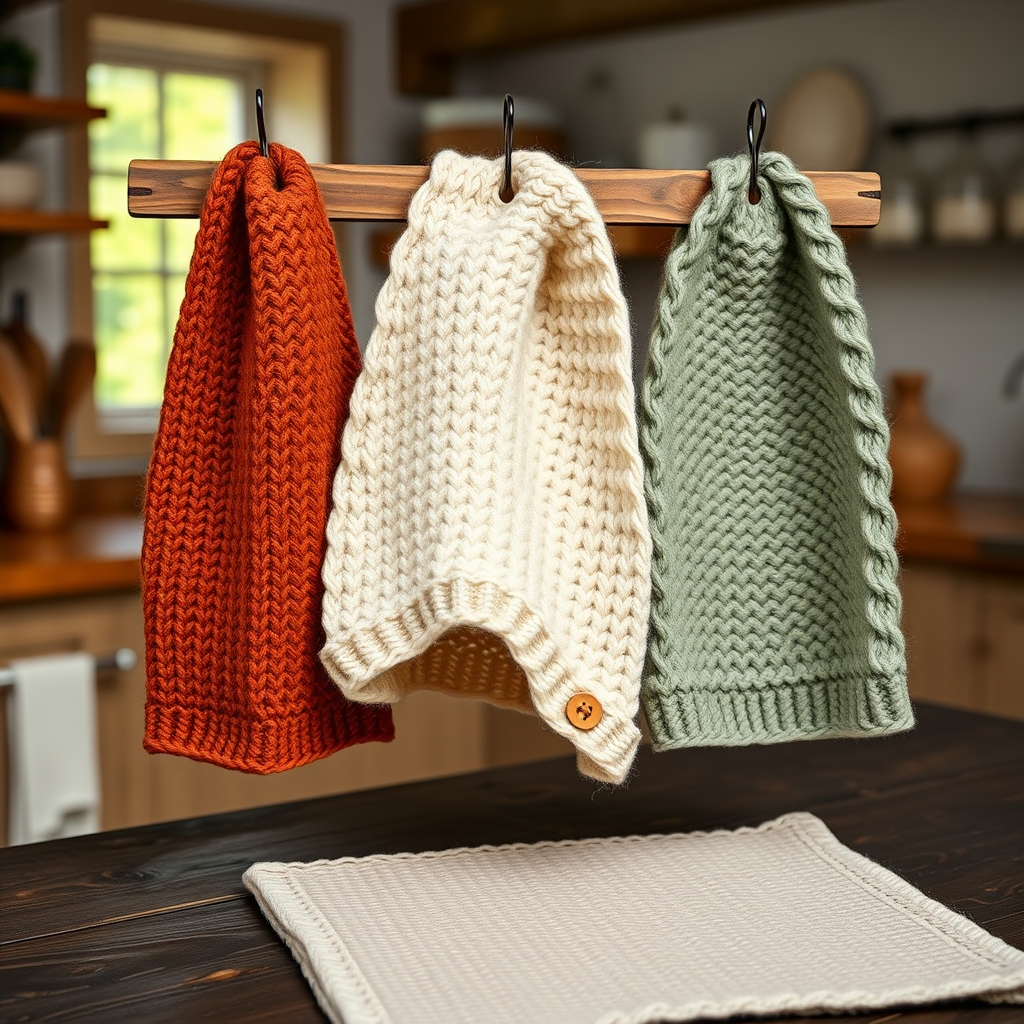
The Harvest Hearth Scrap Dishtowel Set Free Pattern – A Knitted Trio of Textured Towels with Woodland Button Tabs
Turn your yarn scraps into a cozy, farmhouse-inspired kitchen trio with this knitted dishtowel set, featuring three distinct stitch textures and charming button-loop tabs for hanging. Each towel is a quick, satisfying project that adds handcrafted warmth to your daily dish-drying ritual. Whether you're a seasoned knitter looking for a weekend project or a beginner ready to tackle your first flat-knit piece, this pattern offers something special: three towels, three textures, and endless kitchen charm.
What makes this set truly delightful is its versatility. The Rustic Ridge Towel showcases a diagonal rib that catches the light beautifully, while the Meadow Lattice Towel offers a plush basketweave that's gentle on your finest glassware. The Sage Honeycomb Towel rounds out the trio with a subtle, honeycomb-inspired texture that adds visual interest without being fussy. Each towel measures approximately 14 inches wide by 20 inches long (including the button tab), making them substantial enough for real kitchen duty while remaining quick to knit.
The button-loop tabs are both functional and decorative – fold the tab over, thread it through the buttonhole, and secure it to the button sewn on the towel body. Hang them from a peg rail, a cabinet handle, or an oven door for easy access and a touch of farmhouse style. This is also a fantastic stash-busting project; those partial skeins of cotton yarn that have been waiting for the right project will finally find their purpose.
Materials Needed
Before you begin, gather the following supplies. All three towels use the same needle size and similar yarn requirements, making this an efficient project to prepare for.
Yarn
- Worsted weight cotton yarn (e.g., Lion Brand Kitchen Cotton) in three colors:
- Color A (rust/terracotta): approximately 150 yards
- Color B (cream/oatmeal): approximately 150 yards
- Color C (sage green): approximately 150 yards
Note: Cotton yarn is essential for dishtowels because it's absorbent, durable, and machine-washable. If you prefer a single color for all three towels, you'll need approximately 450 yards total.
Needles and Notions
- US Size 7 (4.5 mm) knitting needles – straight or circular (if using circular, work back and forth)
- Tapestry needle for weaving in ends and sewing buttons
- Stitch markers (optional, but helpful for keeping track of pattern repeats)
- 3 wooden buttons (1 inch diameter) – choose round, natural wood buttons for a rustic look
- Waste yarn or stitch holder for holding stitches when working the button tab
Gauge
20 stitches and 28 rows = 4 inches in stockinette stitch (blocked)
Gauge is important for achieving the correct finished dimensions. If your gauge is off, adjust your needle size accordingly. A swatch is always worth the time – knit a 4x4 inch square in stockinette, block it, and measure.
Step-by-Step Instructions
This set includes three dishtowels, each with a unique stitch pattern but the same basic construction. Each towel measures approximately 14 inches wide by 20 inches long (including the button tab).
General Notes (Read First!)
- All towels are knitted flat, back and forth on straight needles.
- Selvedge edge: Slip the first stitch of every row purlwise with yarn in front for a neat, tidy edge. This creates a smooth, professional-looking selvedge that prevents curling and makes the towels look finished.
- The button tab is worked as a short extension at the end of each towel, then folded over and buttoned.
- When the pattern says "Sl1," it means slip one stitch purlwise with yarn in front. This is the selvedge stitch.
- End each row with K1 (knit the last stitch) unless otherwise specified – this works with the selvedge to create a balanced edge.
TOWEL 1: The Rustic Ridge Towel (Color A – Rust)
This towel features a diagonal rib pattern that creates a subtle, woven-like texture. The repeating 4-row pattern shifts the rib direction, giving the fabric a gentle, ridged appearance that's both visually interesting and functional for drying.
Cast On and Body
Cast on 70 stitches loosely (use a needle one size up for casting on if you tend to cast on tightly).
Row 1 (RS): Sl1, *K2, P2; repeat from * to last stitch, K1.
Row 2 (WS): Sl1, *P2, K2; repeat from * to last stitch, K1.
Row 3: Sl1, *P2, K2; repeat from * to last stitch, K1.
Row 4: Sl1, *K2, P2; repeat from * to last stitch, K1.
Repeat Rows 1-4 until piece measures 18 inches from cast-on edge, ending with a WS row (meaning the last row you knit should be a wrong-side row, so the next row you work will be a right-side row).
Pro tip: Place a stitch marker every 10 stitches on the first row to help you keep track of the pattern repeat. You can remove them after a few rows once you get into the rhythm.
Button Tab
Next Row (RS): Sl1, K8. You now have 9 stitches on your right needle. Turn work, leaving remaining 61 stitches on a holder or waste yarn. These stitches will not be worked again – they form the body of the towel.
Work back and forth on these 9 stitches in garter stitch (knit every row) for 2 inches. The garter stitch creates a sturdy, non-curling tab that will fold over nicely.
Buttonhole Row 1 (RS): K3, K2tog, YO, K4. (The YO creates a hole for the button.)
Buttonhole Row 2: Knit all stitches. (The YO from the previous row is knitted as a regular stitch, completing the buttonhole.)
Knit 2 more rows in garter stitch (so you have 4 rows total after the buttonhole rows). Bind off all 9 stitches loosely.
Note: The buttonhole should be positioned so that when you fold the tab over, the hole aligns with where you'll sew the button on the towel body.
Finishing Towel 1
Fold the button tab over to the back of the towel. The tab should fold at the point where the 9 stitches were separated from the main body. Position the button on the main body of the towel, directly under the buttonhole. Make sure the button is centered and will fit through the hole comfortably. Sew the button securely with the tapestry needle and matching thread or yarn. Weave in all ends using the tapestry needle, running the yarn through the wrong side of the fabric for about 2 inches, then trimming close.
TOWEL 2: The Meadow Lattice Towel (Color B – Cream)
This towel uses a simple basketweave pattern for a plush, textured feel. The 8-row repeat creates a classic woven look that's both elegant and practical. The cream color shows off the texture beautifully.
Cast On and Body
Cast on 70 stitches loosely.
Row 1 (RS): Sl1, *K4, P4; repeat from * to last stitch, K1.
Row 2 (WS): Sl1, *P4, K4; repeat from * to last stitch, K1.
Row 3: Repeat Row 1.
Row 4: Repeat Row 2.
Row 5: Sl1, *P4, K4; repeat from * to last stitch, K1.
Row 6: Sl1, *K4, P4; repeat from * to last stitch, K1.
Row 7: Repeat Row 5.
Row 8: Repeat Row 6.
Repeat Rows 1-8 until piece measures 18 inches from cast-on edge, ending with a WS row.
Tip: The basketweave pattern creates a reversible fabric – both sides look great, so you can use either side facing outward when hanging.
Button Tab
Work the same as Towel 1's button tab: Sl1, K8 on the next RS row, turn, and work 9 stitches in garter stitch for 2 inches. Then work the buttonhole rows (K3, K2tog, YO, K4; then knit all stitches), knit 2 more rows, and bind off.
Finishing Towel 2
Fold tab over, sew button, weave in ends – exactly as described for Towel 1.
TOWEL 3: The Sage Honeycomb Towel (Color C – Sage)
This towel features a honeycomb-like stitch pattern created with simple knits and purls. The 4-row repeat produces a subtle, dimensional texture that resembles a honeycomb – perfect for adding visual interest to your kitchen without being overwhelming.
Cast On and Body
Cast on 70 stitches loosely.
Row 1 (RS): Sl1, *K1, P1; repeat from * to last stitch, K1.
Row 2 (WS): Sl1, *P1, K1; repeat from * to last stitch, K1.
Row 3: Sl1, *P1, K1; repeat from * to last stitch, K1.
Row 4: Sl1, *K1, P1; repeat from * to last stitch, K1.
Repeat Rows 1-4 until piece measures 18 inches from cast-on edge, ending with a WS row.
Note: This pattern is essentially a seed stitch variation with a twist – the stitch pattern shifts every 2 rows, creating the honeycomb effect. It's simple enough to memorize quickly.
Button Tab
Work the same as Towel 1's button tab: Sl1, K8 on the next RS row, turn, and work 9 stitches in garter stitch for 2 inches. Then work the buttonhole rows, knit 2 more rows, and bind off.
Finishing Towel 3
Fold tab over, sew button, weave in ends – exactly as described for Towel 1.
Blocking Instructions
Blocking is the final step that transforms your knitted towels from "homemade" to "handcrafted." It evens out the stitches, opens up the texture, and gives a professional finish.
- Soak: Fill a clean sink or basin with lukewarm water and add a drop of mild soap (wool wash or gentle dish soap works well). Submerge each towel completely and let soak for 15-20 minutes.
- Gently squeeze: Remove the towel from the water and gently squeeze out excess water. Do NOT wring or twist – this can distort the stitches and damage the cotton fibers.
- Roll in a towel: Lay the wet towel flat on a clean, dry bath towel. Roll the bath towel up with the knitted towel inside, pressing gently to absorb more water.
- Shape: Unroll and place the knitted towel on a dry towel or blocking mat. Gently shape it to the correct dimensions (14 inches wide by 20 inches long including the tab). Smooth out any wrinkles or uneven areas with your hands.
- Dry completely: Allow the towel to air dry completely. This may take 24-48 hours depending on humidity. Do not use a dryer or place near direct heat.
Once dry, your towels are ready to use and admire. The blocking process will have evened out the stitch tension, making the textures pop and the edges look crisp and professional.
Final Thoughts and Customization Ideas
This Harvest Hearth Dishtowel Set is more than just a practical kitchen accessory – it's a statement of handmade warmth and creativity. The three distinct textures mean you'll never get bored knitting them, and the button tabs add a charming, functional detail that sets these towels apart from store-bought versions.
Feel free to customize your set:
- Color variations: Choose colors that match your kitchen decor, or use up scraps in coordinating shades.
- Button styles: Swap wooden buttons for ceramic, shell, or colorful plastic buttons to change the look entirely.
- Size adjustments: To make smaller towels (for guest bathrooms or as hand towels), cast on fewer stitches (e.g., 56 stitches for a 12-inch width) and adjust the length accordingly.
- Gift idea: This set makes a wonderful housewarming or wedding gift. Package the three towels tied with a ribbon and include a care card.
These towels are also incredibly practical – cotton yarn is machine washable and becomes more absorbent with each wash. They'll soften over time and develop a lovely, lived-in feel that only improves with use.
Happy knitting, and enjoy the warmth and beauty these handcrafted towels bring to your kitchen!


