The Gilded Fern Midi Dress Free Pattern – A Knitted Botanical Lace Column Dress
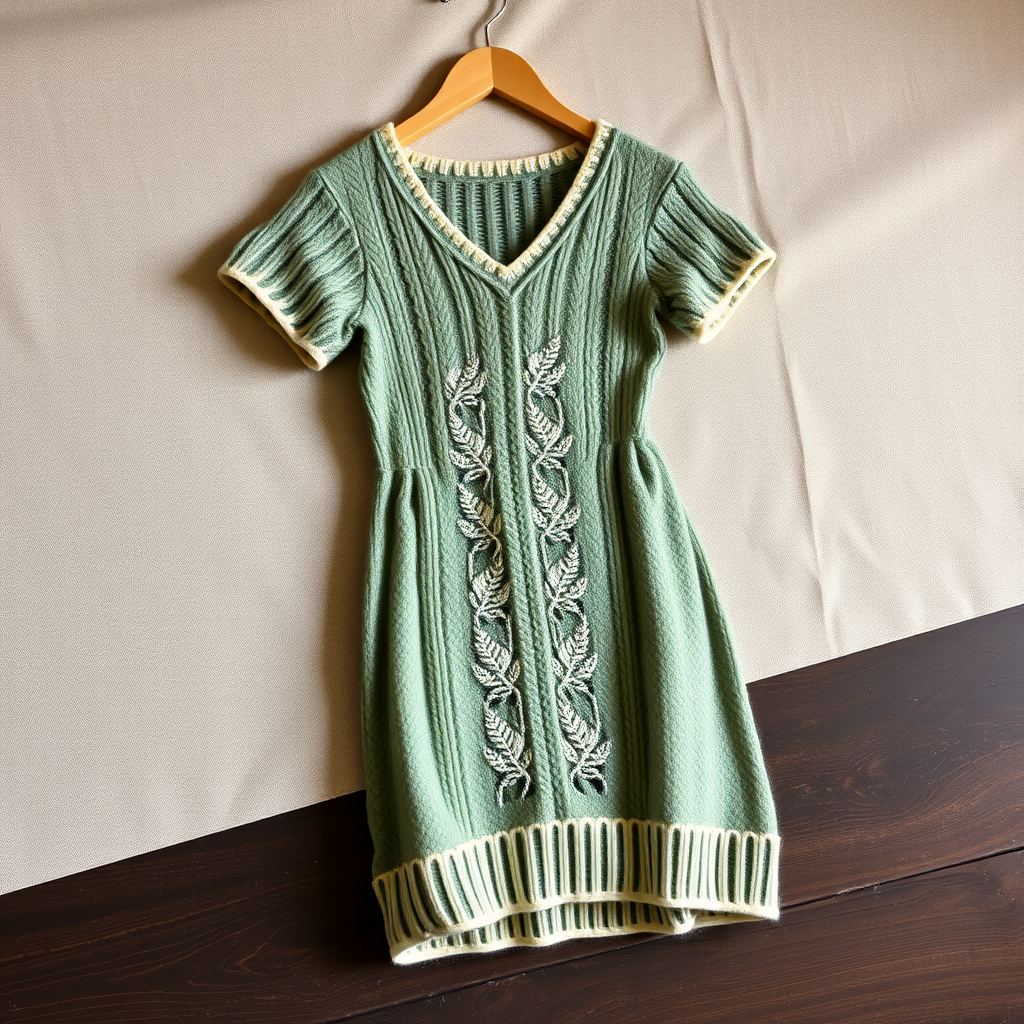
The Gilded Fern Midi Dress: A Free Knitted Botanical Lace Column Dress Pattern
Wrap yourself in a garden of textured stitches with this fitted midi dress, where cascading fern lace panels meet a cozy ribbed bodice. This original design blends delicate botanical motifs with a modern column silhouette for a piece that feels both heirloom and contemporary. The Gilded Fern Midi Dress is an intermediate-level knitting project that rewards your effort with a stunning, wearable work of art. Whether you're heading to a garden party or a gallery opening, this dress will make you feel like you're wearing a piece of living art.
This free pattern is designed to be approachable for confident beginners who have mastered basic lace techniques. The combination of stockinette and a repeating 16-row lace panel creates a rhythmic, meditative knitting experience. Let's dive into creating this botanical masterpiece!
Materials Needed
Before you begin, gather these supplies to ensure a smooth knitting experience:
Yarn
- Main Color (MC): Worsted weight cotton-wool blend (e.g., Knit Picks CotLin) in Sage Green – 1200 (1350, 1500, 1650) yards
- Contrast Color (CC): Same yarn base in Cream – 200 yards
Needles & Notions
- US 7 (4.5 mm) circular needles, 32-inch length (for main body)
- US 6 (4.0 mm) circular needles, 32-inch length (for ribbing)
- Stitch markers (at least 8)
- Stitch holders (or waste yarn)
- Tapestry needle for weaving in ends
- Scissors
Gauge
20 sts x 28 rows = 4 inches in stockinette on US 7 needles. Always knit a gauge swatch first to ensure your dress fits as intended. Adjust needle size if necessary to match gauge.
Step-by-Step Instructions
This pattern is written for sizes XS (S, M, L) with finished bust measurements of 32 (36, 40, 44) inches and total length of 42 (43, 44, 45) inches. Instructions are given for the smallest size, with larger sizes in parentheses.
Special Stitches: Fern Lace Panel (worked over 12 sts)
This is the heart of the design. The panel creates a beautiful botanical motif with eyelet leaves and stems. Work the following 16-row repeat:
- Row 1 (RS): k2, yo, k2tog, k6, ssk, yo, k2
- Row 2 (and all WS rows): purl all sts
- Row 3: k3, yo, k2tog, k4, ssk, yo, k3
- Row 5: k4, yo, k2tog, k2, ssk, yo, k4
- Row 7: k5, yo, k2tog, ssk, yo, k5
- Row 9: k4, ssk, yo, k2, yo, k2tog, k4
- Row 11: k3, ssk, yo, k4, yo, k2tog, k3
- Row 13: k2, ssk, yo, k6, yo, k2tog, k2
- Row 15: k1, ssk, yo, k8, yo, k2tog, k1
- Row 16: purl
Repeat rows 1-16 for the lace pattern. Place a stitch marker on each side of the 12-stitch panel to help you track the pattern.
Bodice (knit in one piece to armholes)
Step 1: With smaller needles (US 6) and MC, cast on 160 (180, 200, 220) sts. Join in the round, being careful not to twist. Place a marker at the beginning of the round.
Step 2: Work k2, p2 ribbing for 2 inches. This creates a snug, comfortable waistband.
Step 3: Switch to larger needles (US 7). Work stockinette stitch (knit every round) for 1 inch.
Step 4: Begin the pattern setup: *Work 12 sts of Fern Lace Panel, k28 (33, 38, 43) sts* – repeat from * to * 4 times around. This creates 4 lace panels evenly spaced around the bodice.
Step 5: Continue in pattern until the piece measures 12 (12.5, 13, 13.5) inches from the cast-on edge, ending after a WS row (if working flat) or at a logical stopping point in the pattern.
Divide for Front and Back
Step 6: Place the next 80 (90, 100, 110) sts on a holder for the front. Continue working the back flat over the remaining 80 (90, 100, 110) sts.
Step 7: Work even in pattern (maintaining lace panels at the sides) until the armhole measures 7 (7.5, 8, 8.5) inches.
Step 8 – Shape shoulders: Bind off 8 (9, 10, 11) sts at the beginning of the next 6 rows. Place the remaining 32 (36, 40, 44) sts on a holder for the back neck.
Front
Step 9: Return the front sts to your needles. Work even until the armhole measures 5 (5.5, 6, 6.5) inches.
Step 10 – Shape neck: Work 30 (34, 38, 42) sts, join a second ball of yarn, bind off the center 20 (22, 24, 26) sts, work to end. You now have two separate shoulder sections.
Step 11: Work each side separately, decreasing 1 st at the neck edge every other row 6 times. This creates a gentle V-neckline.
Step 12: Work even until the armhole matches the back. Shape shoulders as for the back.
Skirt (knit from bodice down)
Step 13: With RS facing and larger needles, pick up and knit 160 (180, 200, 220) sts along the lower edge of the bodice. Join in the round.
Step 14: Work in stockinette for 2 inches.
Step 15 – Begin increases: *k18 (20, 22, 24), m1* – repeat around. This adds 8 stitches per increase round.
Step 16: Repeat the increase round every 10 rows 6 more times. You should now have 224 (252, 280, 308) sts. The skirt will gently flare into an A-line silhouette.
Step 17: Continue in stockinette until the skirt measures 28 (29, 30, 31) inches from the bodice.
Step 18: Switch to smaller needles (US 6). Work k2, p2 ribbing for 2 inches. Bind off loosely to maintain stretch.
Finishing
Step 19: Sew the shoulder seams using mattress stitch or your preferred method.
Step 20 – Neckline trim: With smaller needles and CC, pick up and knit 80 (88, 96, 104) sts around the neckline. Work k1, p1 ribbing for 1 inch. Bind off in pattern.
Step 21: Weave in all ends carefully, using a tapestry needle to hide them within the fabric.
Step 22 – Blocking: This is crucial for lace patterns! Soak the dress in lukewarm water with a gentle wool wash for 20 minutes. Gently squeeze out excess water (never wring). Lay flat on towels and roll to remove moisture. Pin to measurements on a blocking mat, paying special attention to opening up the lace panels. Allow to dry completely.
Pro Tips for Success
- Track your rows: Use a row counter or a simple tally sheet to keep track of the 16-row lace repeat. It's easy to lose your place!
- Lifelines: Insert a lifeline (a piece of contrasting waste yarn threaded through your stitches) every 10-15 rows. If you make a mistake, you can easily rip back to the lifeline without losing all your work.
- Blocking is magic: Don't skip this step! Blocking transforms the lace from a crumpled mess into the beautiful botanical pattern you see in the photos.
- Customize the length: The skirt length is easily adjustable. Try it on as you go and add or remove rows to suit your height.
This dress is a labor of love that will become a treasured piece in your wardrobe. The combination of the sage green and cream trim creates a sophisticated, nature-inspired palette that pairs beautifully with both casual and dressy accessories. Happy knitting!


