The Frosted Finch Snowman Free Pattern – A Crocheted Ode to Winter Whimsy
The Frosted Finch Snowman Free Pattern – A Crocheted Ode to Winter Whimsy
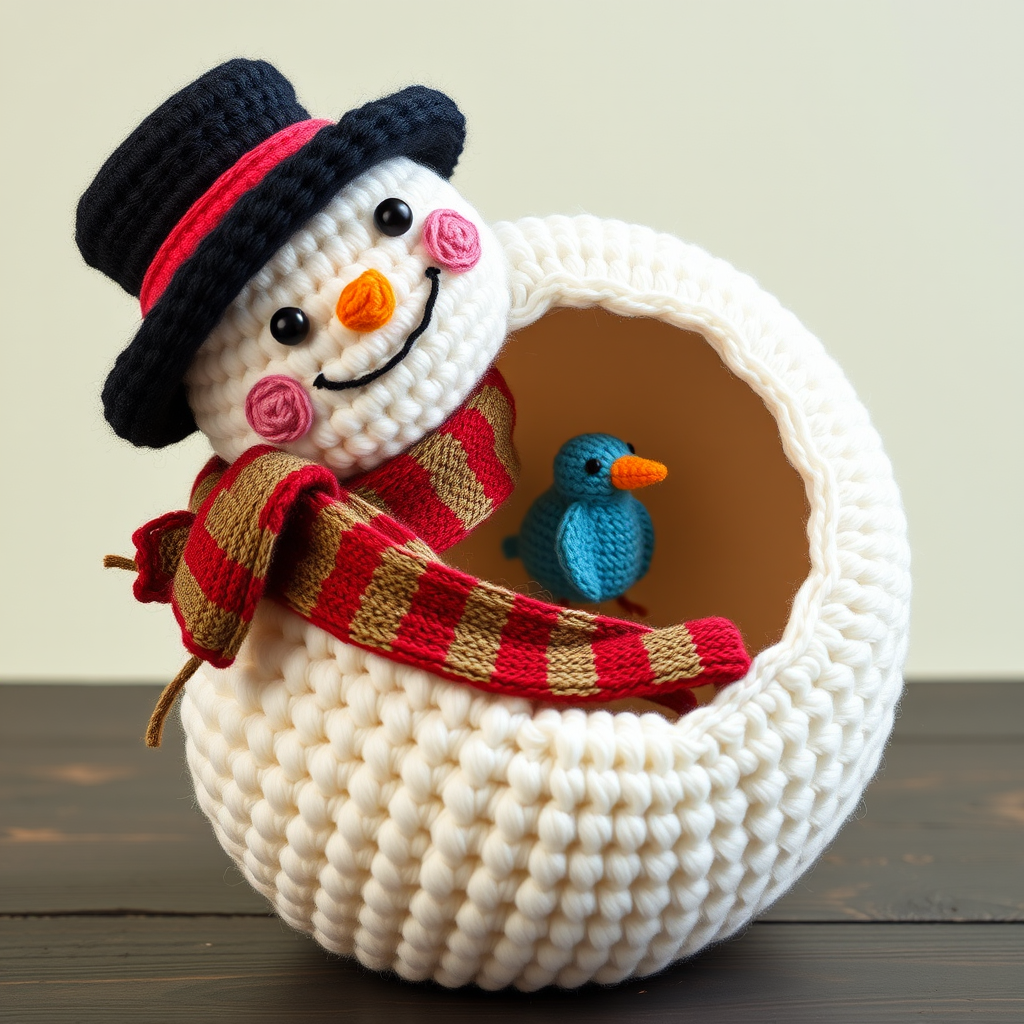
There's something undeniably magical about a snowman—especially one that never melts. This charming amigurumi features a rosy-cheeked snowman cradling a tiny bluebird, perfect for holiday decor or a heartfelt handmade gift. The pattern uses soft, chunky yarn and simple stitches to create a cozy, storybook feel that will warm hearts all winter long.
Whether you're a seasoned crocheter or just starting your amigurumi journey, this pattern is designed to be accessible and rewarding. The finished piece stands about 6 inches tall and makes a wonderful shelf companion, gift topper, or Christmas tree ornament. Let's dive into creating this frosty friend!
Materials Needed
Before we begin, gather these supplies to ensure a smooth crocheting experience:
- Yarn: Worsted weight yarn in the following colors:
- White (main body) – approximately 100 yards
- Black (hat, eyes, smile) – small amount
- Orange (carrot nose, bird beak) – small amount
- Soft blue (bird body) – small amount
- Brown (optional, for bird details) – scrap
- Pink (cheeks) – tiny amount
- Red and green (optional scarf) – small amounts
- Hook: 3.5mm (E) crochet hook
- Stitch markers (to track rounds)
- Tapestry needle (for sewing and weaving ends)
- Polyester fiberfill stuffing
- Small black beads (optional, for bird eyes)
- Scissors
Gauge: Not critical for this project; aim for a tight tension to prevent stuffing from showing. Approximately 4 sc = 1 inch.
Step-by-Step Instructions
This pattern is worked in continuous rounds (spiral) unless otherwise noted. Use a stitch marker to track the beginning of each round. Work tightly to keep the stuffing hidden.
Snowman Body (Make 2 Pieces: Bottom and Top)
Bottom Body
Worked in white yarn.
- R1: Magic ring, 6 sc in ring. (6)
- R2: 2 sc in each st around. (12)
- R3: (Sc in next st, 2 sc in next st) around. (18)
- R4: (Sc in next 2 sts, 2 sc in next st) around. (24)
- R5: (Sc in next 3 sts, 2 sc in next st) around. (30)
- R6-R10: Sc in each st around. (30)
- R11: (Sc in next 3 sts, sc2tog) around. (24)
- R12: (Sc in next 2 sts, sc2tog) around. (18)
- Stuff firmly. Make sure the bottom is well-padded but not misshapen.
- R13: (Sc in next st, sc2tog) around. (12)
- R14: Sc2tog around. (6)
- Fasten off, leaving a long tail. Weave through front loops, pull tight, and secure. Set aside.
Top Body
Worked in white yarn.
- R1: Magic ring, 6 sc in ring. (6)
- R2: 2 sc in each st around. (12)
- R3: (Sc in next st, 2 sc in next st) around. (18)
- R4: (Sc in next 2 sts, 2 sc in next st) around. (24)
- R5-R8: Sc in each st around. (24)
- R9: (Sc in next 2 sts, sc2tog) around. (18)
- Stuff firmly.
- R10: (Sc in next st, sc2tog) around. (12)
- R11: Sc2tog around. (6)
- Fasten off, leaving a long tail. Weave through front loops, pull tight, and secure.
Bird (Make 1)
Worked in soft blue yarn.
- R1: Magic ring, 6 sc in ring. (6)
- R2: (Sc in next st, 2 sc in next st) around. (9)
- R3: Sc in each st around. (9)
- R4: (Sc in next 2 sts, 2 sc in next st) around. (12)
- R5: Sc in each st around. (12)
- R6: (Sc in next 3 sts, 2 sc in next st) around. (15)
- R7-R8: Sc in each st around. (15)
- R9: (Sc in next 3 sts, sc2tog) around. (12)
- Stuff lightly. The bird should be soft and squishy, not overstuffed.
- R10: (Sc in next st, sc2tog) around. (8)
- R11: Sc2tog around. (4)
- Fasten off, leaving a long tail. Weave through front loops, pull tight, and secure.
Bird's Beak
Worked in orange yarn.
- Ch 2, sc in 2nd ch from hook.
- Fasten off, leaving a tail to sew onto the bird's face.
Bird's Wings (Make 2)
Worked in blue yarn.
- Ch 3, sc in 2nd ch from hook, sc in next ch.
- Fasten off, leaving a tail. Sew to the sides of the bird.
Snowman's Hat
Worked in black yarn.
- Ch 6, join with sl st to form a ring.
- R1: Sc in each ch around. (6)
- R2: (Sc in next st, 2 sc in next st) around. (9)
- R3: (Sc in next 2 sts, 2 sc in next st) around. (12)
- R4: Sc in each st around. (12)
- R5: (Sc in next 3 sts, 2 sc in next st) around. (15)
- R6: Sc in each st around. (15)
- R7: (Sc in next 4 sts, 2 sc in next st) around. (18)
- R8: Sc in each st around. (18)
- R9: (Sc in next 5 sts, 2 sc in next st) around. (21)
- R10: Sc in each st around. (21)
- R11: (Sc in next 6 sts, 2 sc in next st) around. (24)
- R12: Sc in each st around. (24)
- Fasten off, leaving a long tail. Fold up the brim and sew in place.
Assembly
- Attach top body to bottom body: Sew the top body to the bottom body, aligning the decreases. Ensure the seam is hidden by placing it at the back or bottom. Use the long tail from the top body to whip-stitch the pieces together securely.
- Attach the bird: Sew the bird to the snowman's side, slightly above the middle, as if it's perched on his arm. Position it so it looks like the snowman is cradling it.
- Add bird details: Sew the beak and wings onto the bird. Add small black beads or embroider eyes on the bird using black yarn. Make small French knots or simple stitches for eyes.
- Embroider snowman's face: Using black yarn, embroider the snowman's eyes and smile. For a classic look, make two small round eyes and a gentle curved smile. Use a tapestry needle and create small, tight stitches.
- Add the carrot nose: With orange yarn, ch 3, sc in 2nd ch from hook, sc in next ch, fasten off. Sew this small cone onto the center of the face, between the eyes and smile.
- Add rosy cheeks: Using a small amount of pink yarn, embroider circular stitches on both cheeks. This adds a sweet, flushed look.
- Place the hat: Position the hat on the snowman's head and sew it in place. Make sure it sits at a jaunty angle for extra charm.
- Optional scarf: Create a small scarf with contrasting colors (ch 30, sc in each ch) and wrap it around the snowman's neck, tying a knot. You can use red and green for a festive touch, or any colors you like.
Weave in all ends securely. Trim any excess yarn, and your Frosted Finch Snowman is complete!
Tips for Perfect Results
- Maintain tight tension: This prevents the stuffing from peeking through your stitches.
- Use a stitch marker: Since you're working in continuous rounds, a marker at the beginning of each round will save you from counting mistakes.
- Stuff gradually: Add stuffing in small amounts, shaping as you go. This gives you more control over the final look.
- Personalize it: Feel free to change the scarf colors, add a tiny button, or give your snowman a different expression. This pattern is a canvas for your creativity!
This Frosted Finch Snowman is more than just a crochet project—it's a little piece of winter magic you can hold in your hands. Whether you're making it for yourself or as a gift, the joy it brings is guaranteed to be as warm as a cozy fire on a snowy day. Happy crocheting!


