The Celestial Sloth Amigurumi Free Pattern – Crochet a Dreamy Starry-Eyed Companion
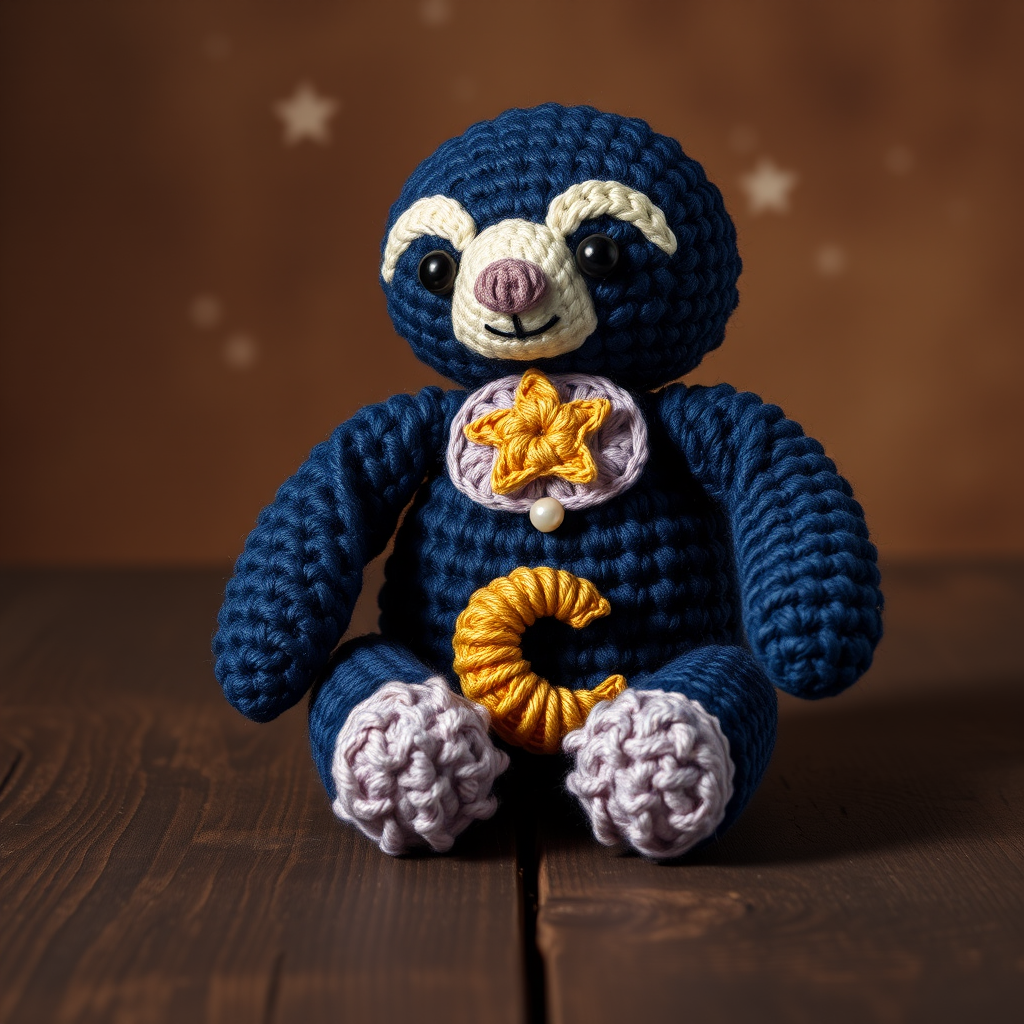
Introducing the Celestial Sloth: A Dreamy Amigurumi Project
Are you ready to crochet a companion that embodies the quiet magic of a starry night? The Celestial Sloth Amigurumi is more than just a toy; it's a handmade hug for dreamers, night owls, and anyone who loves the cozy comfort of a galaxy-inspired palette. With its deep navy blue body, soft lavender face patch, and golden starry eyes, this sloth is designed to be a serene, cuddly friend. This free pattern is perfect for beginners and experienced crocheters alike, guiding you through every stitch to create a truly unique piece. Whether you're looking for a thoughtful handmade gift or a special treat for yourself, this celestial sloth is sure to become a treasured keepsake.
Materials Needed for Your Celestial Sloth
Before you begin your crochet journey, gather these simple materials. The beauty of this project is its simplicity—you only need a few basics to bring your sloth to life.
- Yarn: Worsted weight cotton or acrylic yarn in the following colors:
- Deep Navy Blue (for the main body and head)
- Soft Lavender (for the face patch)
- Cream (for the muzzle and optional face patch base)
- Dusty Rose (for the smile)
- Gold (for the star eyes and crescent moon)
- Crochet Hook: 3.5mm (E) crochet hook
- Other Tools: Stitch markers, yarn needle, scissors, and polyester fiberfill for stuffing.
Note on Gauge: The pattern specifies 4 inches = 16 sc and 18 rows in continuous rounds. While gauge isn't critical for this project, maintaining consistent tension will ensure your sloth is evenly shaped and the pieces fit together nicely.
Step-by-Step Instructions: Crocheting Your Sloth
This pattern is worked in continuous spiral rounds unless otherwise noted. Always use a stitch marker to mark the beginning of each round—this is crucial for keeping track of your progress in spiral crochet. Let's get started!
Crocheting the Head
We'll begin with the head, which is worked from the top down. Use your deep navy blue yarn.
- Round 1: Create a magic ring, then work 6 single crochet (sc) into the ring. Pull tight to close. (6 stitches)
- Round 2: Work 2 sc into each stitch around. (12 stitches)
- Round 3: *Sc in the next stitch, 2 sc in the next stitch*; repeat from * to * around. (18 stitches)
- Round 4: *Sc in the next 2 stitches, 2 sc in the next stitch*; repeat from * to * around. (24 stitches)
- Round 5: *Sc in the next 3 stitches, 2 sc in the next stitch*; repeat from * to * around. (30 stitches)
- Round 6: *Sc in the next 4 stitches, 2 sc in the next stitch*; repeat from * to * around. (36 stitches)
- Rounds 7-12: Sc in each stitch around for 6 rounds. (36 stitches each round)
- Round 13: *Sc in the next 4 stitches, sc2tog (single crochet two together)*; repeat from * to * around. (30 stitches)
- Round 14: *Sc in the next 3 stitches, sc2tog*; repeat from * to * around. (24 stitches)
- Round 15: *Sc in the next 2 stitches, sc2tog*; repeat from * to * around. (18 stitches)
- Stuff the head firmly with fiberfill. This will give your sloth a nice, round shape.
- Round 16: *Sc in the next stitch, sc2tog*; repeat from * to * around. (12 stitches)
- Round 17: Sc2tog around. (6 stitches)
- Fasten off, leaving a tail. Weave the tail through the remaining stitches and pull tight to close the hole. Weave in the end securely.
Crocheting the Body
Next, we'll create the body, which is slightly wider at the bottom so your sloth can sit upright. Continue with the navy blue yarn.
- Round 1: Magic ring, 6 sc in ring. (6 stitches)
- Round 2: 2 sc in each stitch around. (12 stitches)
- Round 3: *Sc in the next stitch, 2 sc in the next stitch*; repeat around. (18 stitches)
- Round 4: *Sc in the next 2 stitches, 2 sc in the next stitch*; repeat around. (24 stitches)
- Round 5: *Sc in the next 3 stitches, 2 sc in the next stitch*; repeat around. (30 stitches)
- Rounds 6-10: Sc in each stitch around for 5 rounds. (30 stitches each round)
- Round 11: *Sc in the next 3 stitches, sc2tog*; repeat around. (24 stitches)
- Round 12: *Sc in the next 2 stitches, sc2tog*; repeat around. (18 stitches)
- Stuff the body firmly with fiberfill.
- Round 13: *Sc in the next stitch, sc2tog*; repeat around. (12 stitches)
- Round 14: Sc2tog around. (6 stitches)
- Fasten off, but leave a long tail (about 12 inches) for sewing the body to the head.
Crocheting the Arms (Make 2)
These little arms are quick to make and give your sloth its characteristic cuddly look.
- Round 1: Magic ring, 6 sc in ring. (6 stitches)
- Round 2: *Sc in the next stitch, 2 sc in the next stitch*; repeat around. (9 stitches)
- Rounds 3-8: Sc in each stitch around for 6 rounds. (9 stitches each round)
- Stuff lightly—you want them soft and flexible, not stiff.
- Flatten the opening and sc2tog across the top to close the arm. Fasten off, leaving a tail for sewing.
Crocheting the Legs (Make 2)
The legs are slightly wider than the arms to support the sloth's seated position.
- Round 1: Magic ring, 6 sc in ring. (6 stitches)
- Round 2: 2 sc in each stitch around. (12 stitches)
- Rounds 3-6: Sc in each stitch around for 4 rounds. (12 stitches each round)
- Stuff lightly.
- Flatten the opening and sc2tog across the top to close. Fasten off, leaving a tail for sewing.
Crocheting the Ears (Make 2)
These simple circles add the perfect finishing touch to the head.
- Round 1: Magic ring, 6 sc in ring. (6 stitches)
- Round 2: 2 sc in each stitch around. (12 stitches)
- Fasten off, leaving a tail for sewing. Do not stuff.
Creating the Face Patch (Optional)
This cream-colored patch gives your sloth its distinctive face shape. If you prefer, you can skip this and embroider directly onto the navy head, but the patch adds a lovely contrast.
- With cream yarn, chain 6.
- Row 1: Sc in the 2nd chain from the hook and across. (5 stitches)
- Row 2: Chain 1, turn, sc in each stitch across. (5 stitches)
- Fasten off, leaving a tail for sewing.
Assembling Your Celestial Sloth
Now for the fun part—bringing all the pieces together! Take your time with the sewing to ensure a neat finish.
- Attach the head to the body: Using the long tail from the body, sew the head securely to the top of the body. Make sure it's centered and sits straight.
- Attach the arms: Sew the arms to the sides of the body, positioning them about 2 rounds down from the neck. This gives the sloth a natural, relaxed pose.
- Attach the legs: Sew the legs to the bottom front of the body. Position them so the sloth sits upright and balanced.
- Attach the ears: Sew the ears to the top sides of the head, slightly forward of the center.
- Attach the face patch: Sew the cream face patch onto the front of the head, centered between the ears and positioned lower on the face.
- Embroider the starry eyes: Using gold yarn, embroider a small five-pointed star on each side of the face patch. Use a satin stitch to fill in the star shape for a smooth, shiny look.
- Embroider the smile: With dusty rose yarn, use a backstitch to create a small, gentle smile below the eyes.
- Create the crescent moon charm: With gold yarn, chain 10. Slip stitch into the first chain to form a ring. Work 6 sc into the ring, then fasten off. Sew this moon to the sloth's belly, or attach it to a small chain to hang from one of the arms for an extra celestial touch.
Finishing Touches
Weave in all remaining ends with your yarn needle. For an extra sparkle, consider sewing a small star-shaped button or bead onto the crescent moon charm. This little detail adds a magical glint that perfectly captures the "celestial" theme.
Your Celestial Sloth is now complete! This dreamy companion is ready to watch over your nights, serve as a unique gift, or simply add a touch of handmade coziness to your space. Happy crocheting!


