The Berry Blush Market Bag Free Pattern – A Crocheted Ode to Strawberry Season
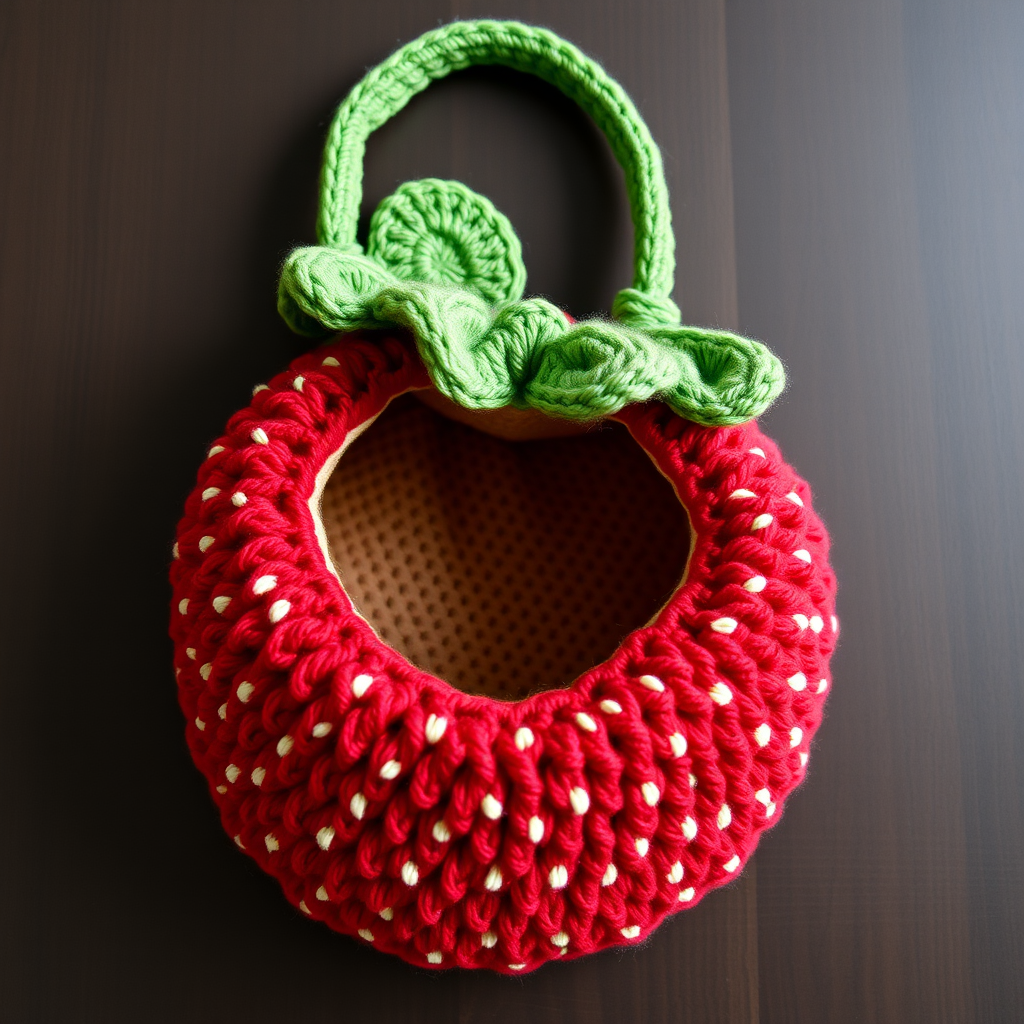
The Berry Blush Market Bag Free Pattern – A Crocheted Ode to Strawberry Season
Carry your farmers' market finds in this adorable strawberry-shaped bag, complete with a leafy green top and seed-speckled body. This crochet pattern is perfect for adding a pop of fruity charm to your everyday errands. Whether you're heading to the grocery store, the beach, or a picnic in the park, this whimsical bag is sure to turn heads and spark conversations. The dense, textured fabric created by single crochet stitches ensures your bag is both sturdy and stylish, making it a practical yet playful accessory for spring and summer.
This pattern is designed with beginners in mind, using only basic stitches and simple shaping. The result is a plump, rounded strawberry with a deep red body, cream-colored seed details, and a leafy green crown that doubles as the bag's opening. With a sturdy green strap, this bag is as functional as it is cute. Let's dive in and create your very own Berry Blush Market Bag!
Materials Needed
Before you begin, gather the following materials. All items are readily available at your local craft store or online.
- Yarn: Worsted weight cotton yarn in three colors:
- Strawberry red (for the body) – approximately 200 yards
- Leaf green (for the top and strap) – approximately 100 yards
- Cream (for the seeds) – small amount, approximately 10 yards
- Crochet Hook: 5.0 mm crochet hook (US H-8)
- Yarn Needle: For weaving in ends and sewing pieces together
- Scissors: For cutting yarn
- Stitch Markers (optional): To help keep track of rounds
Gauge: 16 sc x 18 rows = 4 inches (10 cm) in single crochet. While gauge is not critical for this project, maintaining a consistent tension will ensure your bag is the correct size and shape.
Step-by-Step Instructions
Follow these detailed instructions carefully. The pattern is broken down into sections: the strawberry body, the seeds, the leaf top, and the strap. Take your time, and don't hesitate to refer back to the instructions as needed.
Strawberry Body (Make 2 Pieces, Then Join)
You will create two identical pieces for the front and back of the bag. Each piece is worked in continuous rounds (spiral) without joining at the end of each round. Use a stitch marker to mark the beginning of each round.
Round 1: With red yarn, make a magic ring. Work 6 single crochet (sc) into the ring. Pull the tail to tighten the ring. (6 stitches)
Round 2: Work 2 sc in each stitch around. (12 stitches)
Round 3: *Sc in the next stitch, 2 sc in the next stitch* – repeat from * to * around. (18 stitches)
Round 4: *Sc in the next 2 stitches, 2 sc in the next stitch* – repeat from * to * around. (24 stitches)
Round 5: *Sc in the next 3 stitches, 2 sc in the next stitch* – repeat from * to * around. (30 stitches)
Round 6: *Sc in the next 4 stitches, 2 sc in the next stitch* – repeat from * to * around. (36 stitches)
Round 7: *Sc in the next 5 stitches, 2 sc in the next stitch* – repeat from * to * around. (42 stitches)
Rounds 8-14: Sc in each stitch around. (42 stitches) – These rounds create the straight sides of the strawberry body.
Round 15: *Sc in the next 5 stitches, sc2tog (single crochet 2 together)* – repeat from * to * around. (36 stitches)
Round 16: *Sc in the next 4 stitches, sc2tog* – repeat from * to * around. (30 stitches)
Round 17: *Sc in the next 3 stitches, sc2tog* – repeat from * to * around. (24 stitches)
Round 18: *Sc in the next 2 stitches, sc2tog* – repeat from * to * around. (18 stitches)
Fasten off, leaving a long tail (approximately 12 inches) for sewing. Repeat the entire process to create the second piece.
Seeds (Embroider on Both Pieces Before Joining)
Before joining the two pieces, you'll add the strawberry seeds. This is done with simple embroidery using the cream yarn.
- Thread a yarn needle with a length of cream yarn.
- Starting from the wrong side of the red piece, bring the needle up through the fabric to the right side.
- Make a small 'v' or 'x' stitch by inserting the needle back down a short distance away, creating a small diagonal or cross shape. The stitch should be about 1/4 inch long.
- Repeat this process, spacing the seed stitches randomly across the red body. Aim for a spacing of about 1 inch apart. You can place them in a staggered pattern for a natural look.
- Continue until you are satisfied with the seed distribution. Weave in the ends on the wrong side of the fabric.
- Repeat for the second piece.
Joining the Body
Now it's time to assemble the two halves of your strawberry bag.
- Place the two pieces together with the wrong sides facing each other. The right sides (with the seeds) should be on the outside.
- Thread the long tail from one piece onto a yarn needle.
- Using a whip stitch, sew around the edges of the two pieces. Start at the bottom center and work your way up one side, across the top, and down the other side. Leave the top edge open – this will be the opening of your bag.
- When you reach the starting point, secure the yarn with a knot and weave in the end.
- Turn the bag right side out. The seam will be on the inside, and your strawberry body is complete.
Leaf Top
The leafy green top adds the finishing touch and creates the opening of the bag. You'll work in rounds, starting from the top edge of the strawberry body.
Round 1: With green yarn, attach to the top edge of the bag with a slip stitch. Work 24 sc evenly around the opening. Join with a slip stitch to the first sc. (24 stitches)
Round 2: Ch 1 (does not count as a stitch). *Sc in the next 2 stitches, 2 sc in the next stitch* – repeat from * to * around. Join with a slip stitch. (32 stitches)
Rounds 3-5: Ch 1. Sc in each stitch around. Join with a slip stitch. (32 stitches)
Round 6: Ch 1. *Sc in the next 3 stitches, 2 sc in the next stitch* – repeat from * to * around. Join with a slip stitch. (40 stitches)
Rounds 7-8: Ch 1. Sc in each stitch around. Join with a slip stitch. (40 stitches)
Round 9: Ch 1. *Sc in the next 4 stitches, 2 sc in the next stitch* – repeat from * to * around. Join with a slip stitch. (48 stitches)
Rounds 10-11: Ch 1. Sc in each stitch around. Join with a slip stitch. (48 stitches)
Round 12: Ch 1. *Sc in the next 5 stitches, 2 sc in the next stitch* – repeat from * to * around. Join with a slip stitch. (56 stitches)
Rounds 13-14: Ch 1. Sc in each stitch around. Join with a slip stitch. (56 stitches)
Fasten off and weave in all ends.
Leaf Ruffles (Optional)
To give your bag a more decorative, leafy edge, add a picot edging around the top. This creates a scalloped, ruffle-like effect that mimics strawberry leaves.
- Attach green yarn to any stitch on the top edge of the leaf top with a slip stitch.
- *Sc in the next stitch, ch 3, sl st in the same stitch* – repeat from * to * around the entire top edge.
- Fasten off and weave in the end.
Strap
The strap is simple and sturdy, made with a chain and single crochet.
- With green yarn, make a slip knot and chain 100 (or your desired length). For a longer shoulder strap, chain 120; for a shorter hand strap, chain 80.
- Work 1 sc in the second chain from the hook, and in each chain across. (99 stitches for a 100-chain foundation)
- Fasten off, leaving a long tail for sewing.
- Using a yarn needle and whip stitch, attach each end of the strap to opposite sides of the bag's top edge. Position the strap so it arches over the opening.
- Secure the ends firmly with a few extra stitches, then weave in all ends.
Finishing
Your Berry Blush Market Bag is almost complete! Follow these final steps for a polished result.
- Weave in all remaining loose ends using a yarn needle. Make sure they are securely hidden inside the stitches.
- Optionally, line the bag with fabric for extra durability. Cut a piece of fabric to fit the inside of the bag, sew it into a pouch shape, and hand-stitch it to the inside of the crocheted bag.
- Give your bag a gentle block or steam to even out the stitches and shape the strawberry.
Congratulations! You've created a charming, one-of-a-kind Berry Blush Market Bag. This project is perfect for using up scrap yarn and makes a wonderful gift for fellow fruit lovers. Enjoy your new favorite accessory, and happy crocheting!


