Sherbet Ripple Hooded Toddler Cardigan Free Pattern
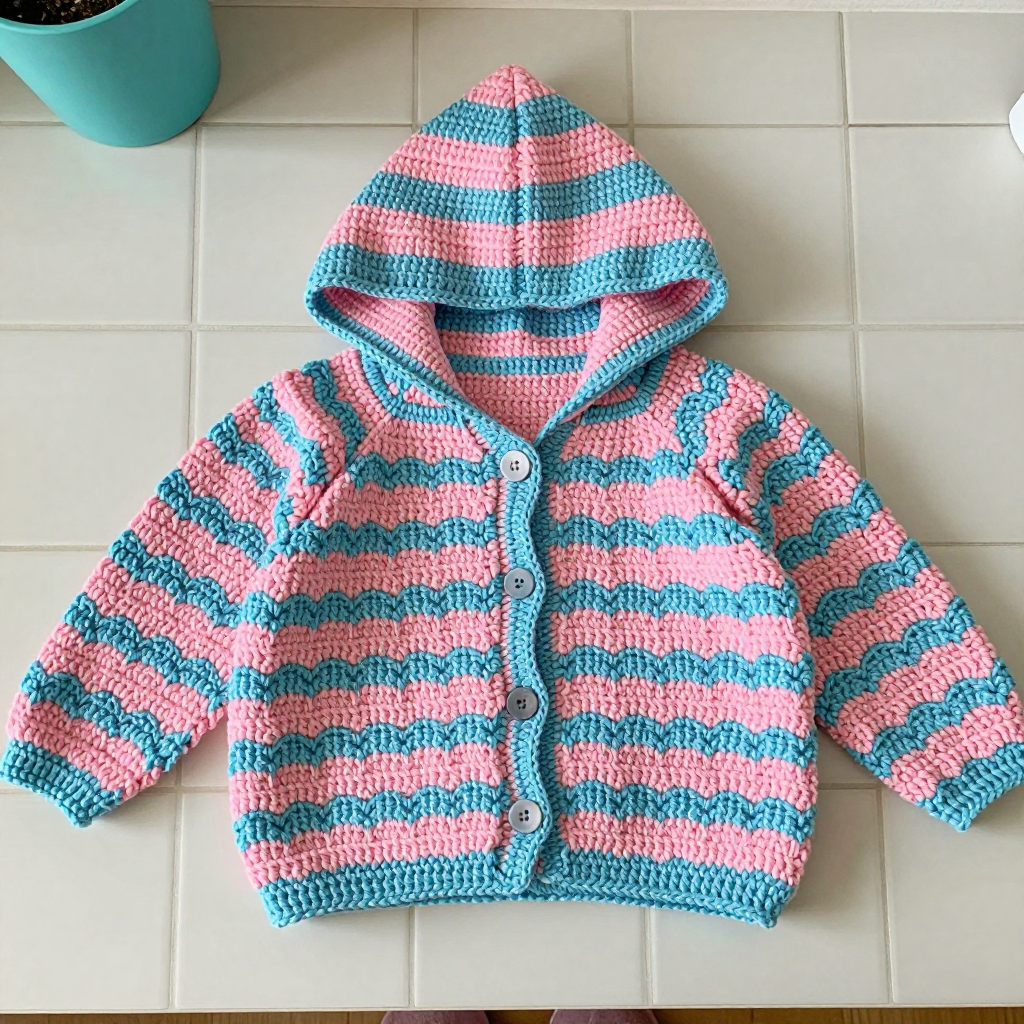
Sherbet Ripple Hooded Toddler Cardigan — Free Beginner Crochet Pattern
Introduction
If you have ever wanted to make a real, wearable piece of clothing but felt nervous about complicated shaping, this Sherbet Ripple Hooded Toddler Cardigan is the perfect first garment. It is worked flat in simple half double crochet ripple rows, which means you only ever need to know one main stitch and one decrease — no working in the round, no confusing armhole math. The two-row candy-stripe sequence of cotton candy pink and baby blue does all the visual work for you, creating bold wavy chevrons that look far more advanced than they are. The finished cardigan is soft, slightly boxy and cropped, with a cozy pointed hood and a sweet baby blue shell edging around every edge. Sized for toddlers 2–4 years, it is a small enough project to finish in a few evenings and adorable enough to become a hand-me-down heirloom.
Materials Needed
- Yarn: Worsted weight (category 4) acrylic or acrylic-cotton blend, approximately 620–700 yards total:
- 350–400 yards cotton candy pink (Color A)
- 270–300 yards baby blue (Color B)
- Crochet hook: US K/10.5 (6.5 mm), or whatever size you need to match the gauge below.
- Stitch markers (at least 6) — small clips or safety pins work fine.
- Tapestry needle (also called a yarn needle) — a large, blunt needle with an eye big enough for worsted yarn, used for seaming and weaving in ends.
- Scissors for cutting yarn.
- 3 small round buttons, about ½ inch (1.25 cm) across.
- Measuring tape for checking gauge and lengths.
Finished measurements: Chest circumference 26 inches (66 cm). Body length from shoulder to hem 14 inches (35.5 cm). Sleeve length from underarm 9 inches (23 cm). Hood depth 9 inches (23 cm). Fits toddlers approximately 2–4 years.
Abbreviations and Beginner Glossary
- ch — chain. Make a loop of yarn on your hook, wrap yarn over the hook, and pull it through the loop. Each one is a chain stitch.
- st / sts — stitch / stitches. One completed unit of crochet work.
- hdc — half double crochet. Wrap yarn over your hook, insert the hook into the stitch, pull up a loop (3 loops on hook), wrap yarn over again, and pull through all 3 loops at once.
- hdc2tog — half double crochet 2 together. A decrease that turns two stitches into one: wrap yarn over, insert hook into the first stitch, pull up a loop (3 loops on hook), wrap yarn over, insert hook into the next stitch, pull up a loop (5 loops on hook), wrap yarn over, pull through all 5 loops. This forms the "valley" of each ripple.
- sc — single crochet. Insert hook into stitch, pull up a loop (2 loops on hook), wrap yarn over, pull through both loops.
- dc — double crochet. Wrap yarn over, insert hook into stitch, pull up a loop (3 loops on hook), wrap yarn over and pull through 2 loops, wrap yarn over and pull through the last 2 loops.
- sl st — slip stitch. Insert hook into stitch, wrap yarn over, and pull through both the stitch and the loop on your hook at the same time. It creates almost no height.
- RS — right side. The "public" side of the fabric that faces out when worn.
- turn — flip your work over so you can crochet back across the row you just finished.
- A / B — Color A (cotton candy pink) and Color B (baby blue).
- fasten off — cut the yarn a few inches from your work and pull the tail all the way through the last loop to lock it.
- whipstitch — a simple seaming stitch: bring the needle up through both layers, over the edge, and back up again in a spiral, like lacing.
Gauge
12 hdc x 8 rows = 4 inches (10 cm) in ripple pattern; each ripple repeat measures about 3 inches (7.5 cm) wide.
Gauge simply means how big your stitches come out. If your stitches are bigger than the pattern assumes, the cardigan will be too large; if smaller, it will be too small. To check: chain 27 (two ripple repeats plus edge stitches), work 8 rows of the ripple pattern, then lay the swatch flat and measure a 4-inch section in the middle with your tape. If you have more than 12 stitches in 4 inches, switch to a larger hook; if fewer, switch to a smaller hook. Always swatch before you begin — it takes 15 minutes and saves hours of rework.
Beginner Tips Before You Start
- Count your stitches at the end of every row. Ripple patterns drift out of shape quickly if a stitch is missed. Your Back should always be 75 stitches and each Front always 39.
- Place a stitch marker in the first and last stitch of each row. The turning chain at the start of a row is easy to mistake for a stitch, and markers remove all doubt.
- Do not pull your yarn too tight. Ripple fabric needs to relax to form its waves. Keep your loops loose and even, and let the hook do the work.
- Carry the unused color loosely up the side edge. When you change colors every 2 rows, simply drop Color A, pick up Color B, and continue — do not cut. Keep the carried strand relaxed so the edge does not pucker.
- Work your hdc2tog loosely. A tight decrease is the number one cause of a ripple that narrows row by row.
- Keep all three body pieces the same length. Lay the Back and both Fronts side by side before seaming to confirm they match at 13 inches.
Step-by-Step Instructions
Ripple Pattern (multiple of 12 sts + 3)
Row 1 (RS): Ch 2 (does not count as a st), hdc in first st, *hdc in next 4 sts, hdc2tog over next 2 sts, hdc in next 4 sts, 2 hdc in next st; rep from * to last 2 sts, hdc in last 2 sts. Turn.
Row 2: Ch 2, hdc in first st, *hdc in next 4 sts, hdc2tog, hdc in next 4 sts, 2 hdc in next st; rep from * to last 2 sts, hdc in last 2 sts. Turn.
Repeat Row 2 for the pattern. Each 12-stitch repeat forms one ripple wave with a peak (2 hdc in one stitch) and a valley (hdc2tog).
Stripe sequence: Work 2 rows A, then 2 rows B, repeating throughout the body, sleeves, and hood. Carry the unused color loosely up the side edge; do not cut between stripes.
Back
With A, ch 75.
Row 1 (RS): Work Row 1 of ripple pattern across. (75 sts — 6 full ripples plus edge stitches)
Rows 2–26: Continue ripple pattern, changing color every 2 rows following the stripe sequence. (75 sts) Piece measures about 13 inches (33 cm). Fasten off, leaving a 24-inch tail for seaming.
Left Front
With A, ch 39.
Row 1 (RS): Work Row 1 of ripple pattern across. (39 sts — 3 ripples plus edge stitches)
Rows 2–26: Continue ripple pattern and stripe sequence as for Back. (39 sts) Fasten off, leaving a 24-inch tail.
Right Front
Work exactly as Left Front: ch 39, then Rows 1–26 in ripple pattern and stripe sequence. (39 sts) Fasten off, leaving a 24-inch tail.
Sleeves (make 2)
With A, ch 39.
Row 1 (RS): Work Row 1 of ripple pattern. (39 sts)
Rows 2–6: Continue ripple pattern and stripe sequence. (39 sts)
Row 7 (increase row): Ch 2, hdc in first st, 2 hdc in next st, work in ripple pattern to last 2 sts, 2 hdc in next st, hdc in last st. (41 sts)
Rows 8–11: Work even in ripple pattern and stripe sequence. (41 sts)
Row 12 (increase row): Repeat Row 7. (43 sts)
Rows 13–15: Work even. (43 sts)
Row 16 (increase row): Repeat Row 7. (45 sts)
Rows 17–19: Work even. (45 sts)
Row 20 (increase row): Repeat Row 7. (47 sts)
Rows 21–23: Work even. (47 sts)
Row 24 (increase row): Repeat Row 7. (49 sts)
Rows 25–28: Work even in ripple pattern and stripe sequence until the sleeve measures 9 inches (23 cm) from the beginning, ending after a B stripe row. (49 sts) Fasten off, leaving a 20-inch tail.
Hood
With RS facing and B, join yarn at the right front neckline edge.
Row 1 (RS): Work 1 hdc in each st around the entire neckline opening, skipping no sts and working evenly across the shoulder seams. (63 sts) Turn.
Row 2: Ch 2, hdc in each st across. (63 sts) Turn.
Rows 3–18: Continue in ripple pattern (multiple of 12 + 3; on the first pattern row, adjust by working a hdc2tog or 2 hdc at center back to reach 63 sts), following the stripe sequence. (63 sts) Hood measures about 9 inches (23 cm) deep.
Row 19 (shaping): Ch 2, hdc2tog, work in pattern to last 2 sts, hdc2tog. (61 sts) Turn.
Row 20: Repeat Row 19. (59 sts)
Row 21: Repeat Row 19. (57 sts)
Fold the hood in half with RS together and whipstitch the top seam closed. Fasten off.
Edging
With B, join yarn at the bottom right front corner.
Round 1: Work 1 round of sc evenly up the right front edge, around the hood opening, and down the left front edge, working 3 sc in each corner so the fabric turns neatly.
Round 2 (shell edging): *Skip 2 sts, 5 dc in next st, skip 2 sts, sl st in next st; rep from * around the entire outer edge, including the hem and cuffs. Fasten off and weave in all ends.
Assembly and Finishing
Shoulder seams: With right sides facing, thread a long tail onto your tapestry needle. Whipstitch the outer 24 sts of each Front to the outer 24 sts of the Back, leaving the center 27 sts of the Back open for the neckline. To whipstitch, bring the needle up through both layers, wrap over the edge, and come up again in a spiral — keep the stitches snug but not tight.
Side seams: Sew from the underarm down to the hem on each side, matching stripe rows as you go.
Sleeves: Sew each sleeve seam first, then set the sleeve into the armhole, matching the underarm point to the side seam and easing the sleeve cap into place.
Buttons: Sew 3 buttons evenly along the left front edge, using the natural spaces between hdc stitches on the right front as buttonholes.
Weaving in ends: Thread each tail onto the tapestry needle and weave it back and forth through the wrong side of the fabric for about 2 inches, then trim close.
Blocking: Mist the finished cardigan lightly with water, lay it flat on a towel, and gently pat it to the measurements above. Let it dry completely — this relaxes the ripple waves and evens out your stitches.
Pro Tips and Variations
- Change the palette: Swap pink and blue for mint and cream, or mustard and rust, for a completely different mood. Keep the 2-row stripe rhythm so the ripple stays crisp.
- Adjust the size: To go up or down a size, add or remove one 12-stitch ripple repeat (about 3 inches of width) from the Back and each Front, and add or remove rows in multiples of 2 to keep the stripe sequence intact.
- Substitute yarn: A cotton-blend worsted gives a crisper, more defined ripple; a soft acrylic gives a squishier, drapier cardigan. Always re-check your gauge with a new yarn.
- Skip the hood: Work a simple sc border around the neckline instead of the hood for a lighter spring cardigan — everything else stays the same.


