Serene Meadow Double Bow Crochet Headband Free Pattern
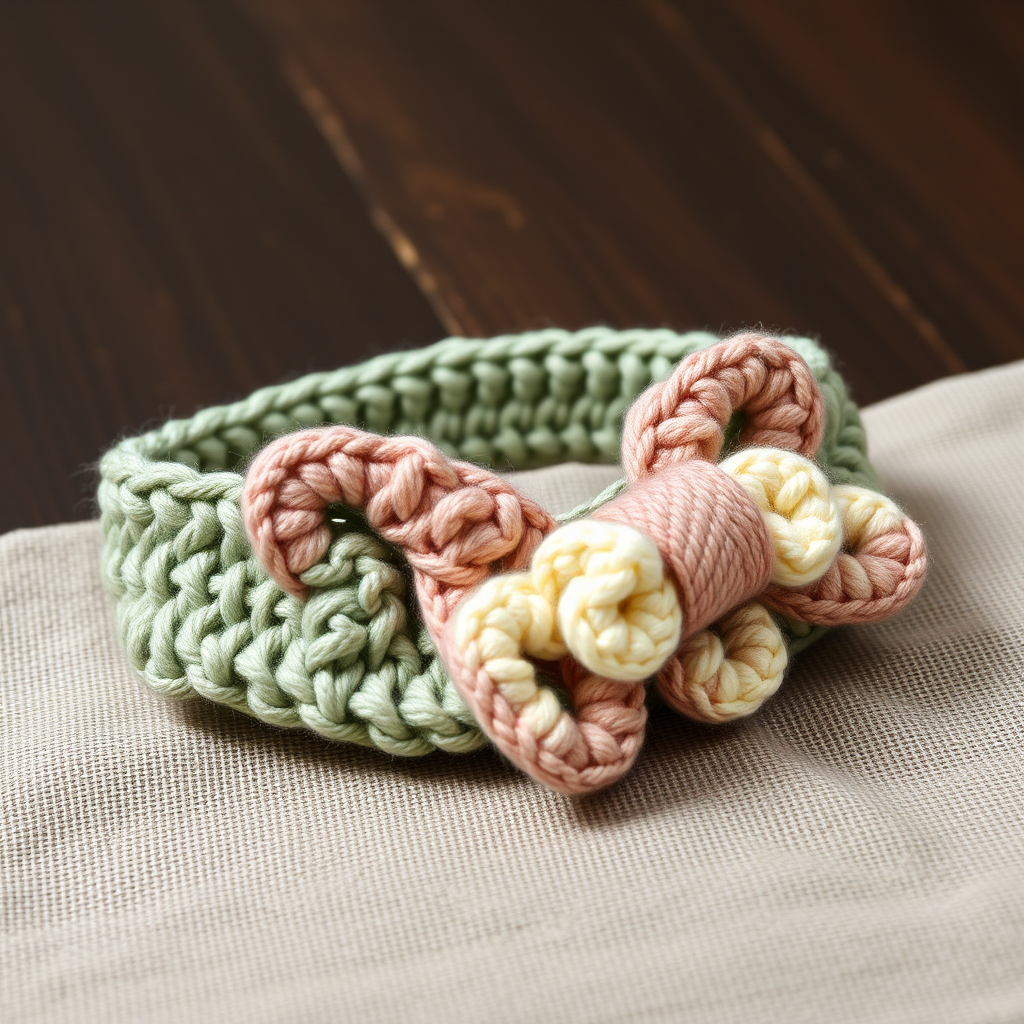
Serene Meadow Double Bow Crochet Headband: A Beginner-Friendly Pattern
There's something undeniably charming about a handcrafted accessory that adds a touch of pastoral elegance to your everyday style. The Serene Meadow Double Bow Crochet Headband is exactly that—a cozy, beautiful piece featuring two soft, dimensional bows that evoke quiet afternoons and gentle breezes. Whether you're new to crochet or looking for a quick, satisfying project, this pattern is designed with beginners in mind. With simple stitches and clear instructions, you'll create a stunning headband that feels both luxurious and handmade.
This pattern uses basic single and double crochet stitches, making it accessible even if you've only just learned to crochet. The result is a thick, plush headband with a serene color palette of sage green, dusty rose, and cream—perfect for cool weather or as a thoughtful handmade gift. Let's dive into everything you'll need and the step-by-step process to bring this beautiful accessory to life.
Materials Needed
Before you begin, gather the following supplies. All items are readily available at craft stores or online, and the total yarn requirement is modest—perfect for using up stash yarn or treating yourself to something special.
- Yarn: Worsted weight cotton or acrylic blend (approximately 100–150 yards). For the pictured headband, use sage green for the base, dusty rose for the larger bow, and cream for the smaller bow. You'll need small amounts of each color.
- Crochet Hook: 5.0 mm (H-8) crochet hook
- Yarn Needle: For sewing pieces together and weaving in ends
- Scissors
- Measuring Tape (optional, for checking headband length)
Gauge: 16 single crochet (sc) x 18 rows = 4 inches (10 cm). Gauge is important for achieving the correct size, but since this is a stretchy headband, slight variations are forgiving. If your headband turns out too loose or too tight, adjust your hook size accordingly.
Step-by-Step Instructions
Follow these detailed instructions carefully. The pattern is broken into three parts: the headband base, the two bows (larger and smaller), and the final assembly. Take your time, and don't hesitate to refer back to the steps as needed.
Part 1: Headband Base
The headband base is a simple, stretchy single crochet band that forms the foundation of your accessory. It's worked in rows and then sewn into a loop.
- Foundation Chain: Chain 8. This creates the width of your headband. If you prefer a wider or narrower band, you can adjust this number, but 8 chains give a nice, comfortable width.
- Row 1: Single crochet (sc) in the 2nd chain from your hook and in each chain across. You should have 7 sc stitches total. The skipped chain counts as your turning chain, and it's normal for the row to look slightly curved at first.
- Row 2: Chain 1, turn your work. Single crochet in each stitch across. (7 sc)
- Repeat Row 2: Continue repeating Row 2 until your headband measures approximately 20 inches (50 cm) or your desired length. To check, gently stretch the band while measuring—it should fit snugly around your head with a little give. If you're making this for someone else, measure their head circumference and subtract about 1–2 inches for stretch.
- Fasten Off: Once you've reached the desired length, fasten off, leaving a long tail (at least 12 inches) for sewing. Thread the tail onto your yarn needle.
- Form the Loop: Fold the headband in half lengthwise so the short ends meet. Using your yarn needle, sew the short ends together with a whip stitch or mattress stitch, creating a continuous loop. Weave in the ends securely and trim any excess yarn.
Part 2: Larger Bow (Make 2)
You'll make two identical rectangles for the larger bow, then shape them into a bow during assembly. The double crochet ridges give the bow its plush, dimensional texture.
- Foundation Chain: Chain 26. This creates the length of your bow rectangle.
- Row 1: Double crochet (dc) in the 4th chain from your hook and in each chain across. The first 3 chains count as your first double crochet, so you'll have 23 dc stitches total. (Remember: the 4th chain from the hook is the first stitch you work into.)
- Row 2: Chain 3 (this counts as your first dc), turn your work. Double crochet in each stitch across. (23 dc)
- Row 3: Chain 1, turn. Single crochet in each stitch across. (23 sc) This row adds a nice finished edge to the bow.
- Fasten Off: Fasten off, leaving a long tail (at least 12 inches).
- Shape the Bow: Fold the rectangle in half widthwise, bringing the short ends together. You'll now have a smaller rectangle. Take the long tail and wrap it tightly around the center of the folded rectangle several times to create the bow's cinched middle. Secure with a knot and weave in the ends, but leave the tail long enough to sew the bow to the headband later.
Part 3: Smaller Bow (Make 2)
The smaller bow follows the same technique but with fewer stitches, creating a delicate contrast to the larger bow.
- Foundation Chain: Chain 18.
- Row 1: Double crochet (dc) in the 4th chain from your hook and in each chain across. (15 dc)
- Row 2: Chain 3 (counts as first dc), turn. Double crochet in each stitch across. (15 dc)
- Fasten Off: Fasten off, leaving a long tail.
- Shape the Bow: Fold the rectangle in half widthwise, bringing the short ends together. Wrap the tail tightly around the center several times to form the bow shape. Secure with a knot and leave the tail for sewing.
Part 4: Assembly
Now it's time to bring all the pieces together. This is where your headband transforms into a beautiful, layered accessory.
- Position the Bows: Place the larger bow on the front center of the headband. Position the smaller bow directly on top of the larger bow, slightly offset to one side. This creates a charming, layered look. Play with the positioning until you're happy with the arrangement.
- Sew the Bows: Using a yarn needle and the tails you left, sew both bows securely to the headband. Pass the needle through the center wraps of the bows and into the headband fabric, making several firm stitches. Ensure the bows are firmly attached and won't shift during wear.
- Secure the Centers: For extra security, you can add a few additional stitches around the bow centers, catching both bows and the headband. This is especially helpful if you plan to wear the headband frequently.
- Weave in Ends: Weave in all remaining yarn ends using your yarn needle, hiding them within the stitches. Trim any excess yarn.
- Final Touch: Gently shape the bows with your fingers, fluffing them slightly to enhance their dimensional look. Your Serene Meadow Double Bow Headband is now complete and ready to wear or gift!
Tips for Success
To ensure your headband turns out beautifully, keep these tips in mind:
- Check Your Tension: Consistent tension is key to an even headband. If your stitches are too tight, the band may be too stiff; if too loose, it may stretch out. Practice on a small swatch if needed.
- Customize the Length: Everyone's head is different. Measure your head circumference and subtract 1–2 inches for a snug, comfortable fit. The single crochet band stretches naturally, so don't make it too long.
- Experiment with Colors: While the sage green, dusty rose, and cream palette is serene and elegant, feel free to choose colors that match your personal style. The pattern works beautifully in any color combination.
- Blocking (Optional): If your headband feels uneven, you can gently block it by wetting it and laying it flat to dry, shaping it as needed. This helps even out stitches and relaxes the yarn.
This Serene Meadow Double Bow Crochet Headband is more than just an accessory—it's a small piece of handmade joy. Whether you're crafting for yourself or creating a thoughtful gift, the process is as rewarding as the finished product. With its soft texture, elegant bows, and beginner-friendly construction, this pattern is sure to become a favorite in your crochet repertoire. Happy crocheting!