Mystic Narwhal Crochet Poncho Buddy Free Pattern
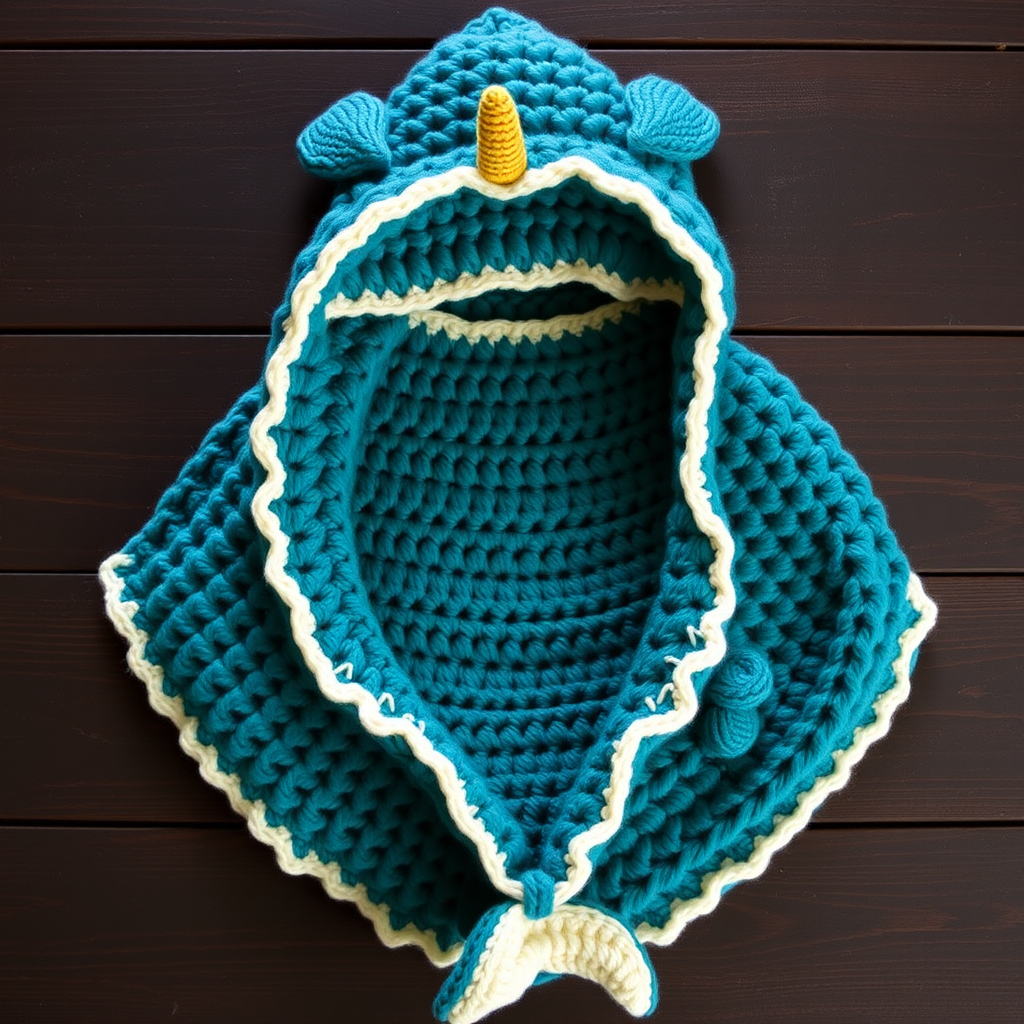
Mystic Narwhal Crochet Poncho Buddy: A Free Pattern for Oceanic Adventures
Dive into a world of whimsy and warmth with our Mystic Narwhal Crochet Poncho Buddy! This enchanting pattern transforms your little one into a mythical sea creature, complete with a cuddly hood, a spiraling golden tusk, and playful fins. More than just a garment, this poncho is a wearable storybook prop, perfect for imaginative play, cozy storytimes, or simply adding a splash of ocean magic to a chilly day. Whether you're a seasoned crocheter or a confident beginner, this free pattern is designed to guide you through every stitch, creating a treasured keepsake that blends comfort with fantasy.
This pattern is worked in continuous rounds and uses basic stitches (single crochet, double crochet), making it an accessible and rewarding project. The result is a dense, plush, and beautifully structured poncho that will be loved for years. Let's get started on this arctic adventure!
Materials Needed
Before we begin, gather your supplies. This project uses worsted weight yarn, which is perfect for creating a durable and cozy fabric.
- Yarn: Worsted weight yarn in three colors:
- Teal (approx. 400g) – for the poncho body, hood, and fins
- Cream (approx. 150g) – for the edging and hood facing
- Gold (approx. 50g) – for the magical tusk
- Crochet Hook: 5.5mm hook (or size needed to obtain gauge)
- Other: Stitch marker, yarn needle for weaving in ends, scissors, and a small amount of polyester fiberfill for the tusk.
Gauge: 14 sc x 16 rows = 4 inches (10 cm) in single crochet. Always check your gauge to ensure the correct size.
Step-by-Step Instructions
This pattern is worked in continuous rounds unless otherwise stated. Use a stitch marker to keep track of your rounds. Let's begin!
Poncho Body (Worked Top-Down)
We'll start from the neckline and work our way down, creating a beautiful circular shape with a subtle spiral increase pattern.
- Round 1: With teal yarn, make a magic ring. Ch 2 (counts as first double crochet), work 11 dc into the ring. Join with a slip stitch to the top of the ch-2. (12 dc)
- Round 2: Ch 2, dc in the same stitch. 2 dc in each stitch around. Join with a slip stitch. (24 dc)
- Round 3: Ch 2, dc in the same stitch, dc in the next stitch. *2 dc in the next stitch, dc in the next stitch* repeat from * to * around. Join. (36 dc)
- Round 4: Ch 2, dc in the same stitch, dc in the next 2 stitches. *2 dc in the next stitch, dc in the next 2 stitches* repeat around. Join. (48 dc)
- Round 5: Ch 2, dc in the same stitch, dc in the next 3 stitches. *2 dc in the next stitch, dc in the next 3 stitches* repeat around. Join. (60 dc)
- Round 6: Ch 2, dc in the same stitch, dc in the next 4 stitches. *2 dc in the next stitch, dc in the next 4 stitches* repeat around. Join. (72 dc)
- Round 7: Ch 2, dc in the same stitch, dc in the next 5 stitches. *2 dc in the next stitch, dc in the next 5 stitches* repeat around. Join. (84 dc)
- Round 8: Ch 2, dc in the same stitch, dc in the next 6 stitches. *2 dc in the next stitch, dc in the next 6 stitches* repeat around. Join. (96 dc)
- Rounds 9-20: Ch 2, dc in each stitch around. Join at the end of each round. (96 dc each round) This creates the straight body of the poncho.
- Round 21: Ch 1, single crochet in each stitch around. Join with a slip stitch to the first sc. Fasten off teal yarn.
Poncho Edging
Now we'll add a delicate, scalloped trim to the bottom edge for a beautiful finish.
- Round 22: Attach cream yarn to any single crochet from the previous round. Ch 1, sc in the same stitch. *Ch 3, skip 1 stitch, sc in the next stitch* repeat from * to * around. Join with a slip stitch to the first sc. Fasten off and weave in the end.
Hood (Worked Separately)
This creates a rounded, oversized hood that will sit comfortably on the shoulders.
- Round 23: With teal yarn, make a magic ring. Ch 2, work 11 dc into the ring. Join. (12 dc)
- Round 24: Ch 2, dc in the same stitch. 2 dc in each stitch around. Join. (24 dc)
- Round 25: Ch 2, dc in the same stitch, dc in the next stitch. *2 dc in the next stitch, dc in the next stitch* repeat around. Join. (36 dc)
- Round 26: Ch 2, dc in the same stitch, dc in the next 2 stitches. *2 dc in the next stitch, dc in the next 2 stitches* repeat around. Join. (48 dc)
- Rounds 27-34: Ch 2, dc in each stitch around. Join at the end of each round. (48 dc each round)
- Round 35: Ch 1, single crochet in each stitch around. Join. Fasten off, leaving a long tail for sewing.
Hood Facing (Worked Flat)
This cream-colored facing will frame the face and add a cozy, folded detail.
- Row 36: With cream yarn, chain 40. Single crochet in the 2nd chain from the hook and in each chain across. (39 sc)
- Rows 37-40: Ch 1, turn. Single crochet in each stitch across. (39 sc each row) Fasten off, leaving a long tail for sewing.
Tusk
This small, golden, spiraling tusk adds the magical finishing touch.
- Round 41: With gold yarn, make a magic ring. Work 6 sc into the ring. (6 sc)
- Round 42: Sc in each stitch around. (6 sc)
- Round 43: 2 sc in each stitch around. (12 sc)
- Rounds 44-50: Sc in each stitch around. (12 sc each round) Fasten off, leaving a long tail. Stuff lightly with fiberfill.
Fins (Make 2)
These small, rounded fins give the poncho its playful, aquatic silhouette.
- Round 51: With teal yarn, chain 6. Sc in the 2nd chain from the hook and in the next 3 chains. Work 3 sc in the last chain. Working on the other side of the chain, sc in the next 3 chains, then 2 sc in the last chain. (12 sc)
- Round 52: Sc in each stitch around. (12 sc) Fasten off, leaving a long tail for sewing.
Assembly
Now for the exciting part—bringing your narwhal to life!
- Sew the Hood: Position the hood on the neck edge of the poncho, aligning the center back. Sew it securely in place using the long tail left from the hood.
- Attach the Facing: Sew the cream hood facing along the front edge of the hood, folding it outward to create a nice frame for the face. Use the long tail to whip stitch it neatly.
- Attach the Tusk: Position the tusk at the center front of the hood, just above the facing. Sew it securely in place.
- Attach the Fins: Sew the fins to the sides of the poncho, about 2 inches below the hood. Position them so they stick out playfully.
- Finish: Weave in all remaining ends with your yarn needle. Give your poncho a gentle block if desired.
Congratulations! You've just created a magical Mystic Narwhal Crochet Poncho Buddy. This cozy, whimsical garment is sure to spark hours of imaginative play and provide endless warmth. Share your creation with us using the hashtag #MysticNarwhalPoncho—we can't wait to see your little one's arctic adventures!


