Enchanted Rosewood Crochet Brooch Free Pattern – A Vintage-Inspired Floral Accent
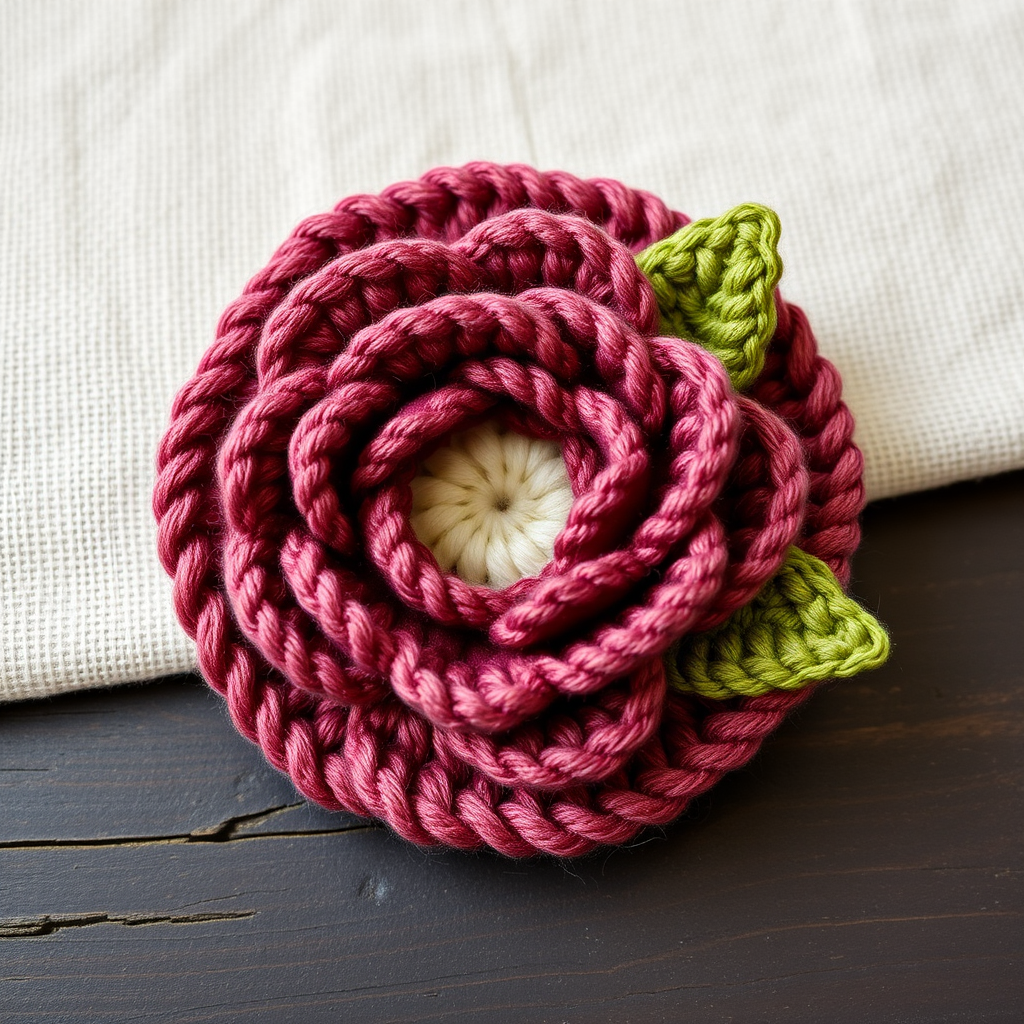
Enchanted Rosewood Crochet Brooch Free Pattern – A Vintage-Inspired Floral Accent
There's something undeniably romantic about a handcrafted Irish rose. This Enchanted Rosewood Crochet Brooch pattern transforms simple crochet stitches into a lush, dimensional accessory that elevates any cardigan, scarf, or handbag. With its rustic rosewood palette—deep dusty rose petals, a soft cream center, and moss green leaves—this brooch captures a timeless vintage charm that never goes out of style.
Whether you're a seasoned crocheter looking for a quick weekend project or a beginner eager to try something new, this pattern is designed to be accessible and rewarding. The finished piece measures approximately 3.5 inches in diameter, making it the perfect statement accent for your favorite outerwear or accessories.
Materials Needed
Before you begin, gather the following materials. This project uses basic crochet supplies and worsted weight yarn, making it easy to source from your local craft store or online.
Yarn
- Yarn A (Rosewood): Worsted weight cotton or acrylic yarn in a deep dusty rose color—approximately 30 yards
- Yarn B (Moss Green): Worsted weight yarn in moss green—approximately 10 yards
- Yarn C (Cream): Worsted weight yarn in cream for the center—approximately 5 yards
Tools & Notions
- Crochet Hook: 4.0 mm (G) hook
- Yarn needle for weaving in ends and assembly
- Stitch marker (optional but helpful)
- Brooch pin or safety pin for the backing
- Small felt circle (optional, to cover stitches on the back)
Gauge
Gauge is not critical for this project. Adjust your hook size if you'd like a larger or smaller flower. The pattern as written produces a brooch approximately 3.5 inches in diameter.
Abbreviations
- ch = chain
- sl st = slip stitch
- sc = single crochet
- hdc = half double crochet
- dc = double crochet
- tr = treble crochet
- rnd = round
Step-by-Step Instructions
Follow these detailed instructions carefully to create your Enchanted Rosewood Brooch. The pattern is broken down into sections: petals, center, leaves, and assembly. Take your time with each piece, and don't hesitate to refer back to the abbreviations if needed.
Rose Petals
You will need to create 5 large petals and 4 small petals in Yarn A (rosewood). Each petal is worked in continuous rounds, creating a flat, circular shape that will later be layered and rolled to form the rose.
Small Petal (Make 4)
Round 1: With Yarn A, chain 2. Work 6 single crochet (sc) into the second chain from the hook. Join with a slip stitch to the first sc. You should have 6 stitches.
Round 2: Chain 1. Work 2 sc into each stitch around. Join with a slip stitch to the first sc. You should now have 12 stitches.
Round 3: Chain 1. *Sc into the next stitch, then 2 sc into the next stitch.* Repeat from * to * around. Join with a slip stitch to the first sc. You should now have 18 stitches.
Fasten off, leaving a long tail (about 8 inches) for sewing the petals together later.
Large Petal (Make 5)
Round 1: With Yarn A, chain 2. Work 6 sc into the second chain from the hook. Join with a slip stitch to the first sc. (6 stitches)
Round 2: Chain 1. Work 2 sc into each stitch around. Join with a slip stitch to the first sc. (12 stitches)
Round 3: Chain 1. *Sc into the next stitch, then 2 sc into the next stitch.* Repeat from * to * around. Join with a slip stitch to the first sc. (18 stitches)
Round 4: Chain 1. *Sc into the next 2 stitches, then 2 sc into the next stitch.* Repeat from * to * around. Join with a slip stitch to the first sc. (24 stitches)
Fasten off, leaving a long tail for assembly.
Rose Center (Cream)
The center of your rose is worked in Yarn C (cream) and will sit in the middle of the layered petals, adding a soft contrast to the deep rosewood color.
Round 1: With Yarn C, chain 2. Work 6 sc into the second chain from the hook. Join with a slip stitch to the first sc. (6 stitches)
Round 2: Chain 1. Work 2 sc into each stitch around. Join with a slip stitch to the first sc. (12 stitches)
Round 3: Chain 1. *Sc into the next stitch, then 2 sc into the next stitch.* Repeat from * to * around. Join with a slip stitch to the first sc. (18 stitches)
Fasten off, leaving a long tail for sewing.
Leaves (Make 3)
Using Yarn B (moss green), you'll create three simple leaves that add an organic, natural touch to the brooch. Each leaf is worked in rows, not rounds.
Row 1: With Yarn B, chain 8. Sc into the second chain from the hook. Hdc into the next chain. Dc into the next 3 chains. Hdc into the next chain. Sc into the last chain. Chain 1 and turn your work.
Row 2: Working along the other side of the chain (the bottom edge), sc into the first stitch. Hdc into the next stitch. Dc into the next 3 stitches. Hdc into the next stitch. Sc into the last stitch.
Fasten off, leaving a long tail for sewing the leaf to the rose.
Assembly
Now comes the fun part—bringing all your pieces together to create the beautiful, dimensional rose. Follow these steps carefully to achieve the signature rolled Irish rose look.
Step 1: Layer the Petals
Arrange the 4 small petals in a circle on your work surface, overlapping them slightly so the edges touch but the center remains open. Place the 5 large petals around them, also overlapping. The center should still be visible and open.
Step 2: Attach the Center
Place the cream center in the middle of the layered petals. Using the tail from the center piece, sew it in place by stitching through the center and the petals beneath it. Make sure it's secure but not too tight—you want the center to sit slightly above the petals.
Step 3: Roll the Petals
This is the key step that creates the rose effect. Gently fold each petal inward, one at a time, working from the center outward. As you fold each petal, use the yarn tails from the petals to stitch through the base of all the petals, pulling them together to create a gathered, spiral effect. Continue rolling and stitching until all petals are secured and the rose has a natural, romantic bloom shape.
Step 4: Attach the Leaves
Turn the rose over so you're looking at the back. Position the 3 leaves evenly spaced around the underside of the rose. Using the tails from the leaves, sew each leaf securely to the back of the rose. Make sure they're attached firmly so they don't flop around.
Step 5: Add the Brooch Pin
Sew a brooch pin or safety pin onto the back of the rose. To make it look neat and professional, you can cover the stitches and the pin base with a small felt circle. Simply cut a circle slightly larger than the pin base, place it over the pin, and sew it in place around the edges.
Step 6: Weave in All Ends
Using your yarn needle, carefully weave in any remaining loose ends on the back of the brooch. Trim any excess yarn.
Finishing Touches
Gently shape your rose by curling the petals outward with your fingers. This gives the flower a more natural, lifelike appearance. Adjust the leaves as needed to frame the rose beautifully.
Your Enchanted Rosewood Crochet Brooch is now complete and ready to adorn a lapel, hat, scarf, or handbag. This handmade accessory makes a wonderful gift for a loved one or a special treat for yourself.
Enjoy your beautiful creation, and happy crocheting!


